
User manual

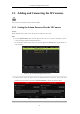
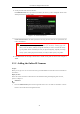
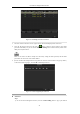
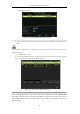
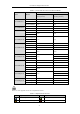

Table Of Contents
- Product Key Features
- Chapter 1 Introduction
- Chapter 2 Getting Started
- Chapter 3 Live View
- Chapter 4 PTZ Controls
- Chapter 5 Recording Settings
- 5.1 Configuring Recording Parameters
- 5.2 Configuring Record Schedule
- 5.3 Configuring Motion Detection Record
- 5.4 Configuring Alarm Triggered Record
- 5.5 Configuring VCA Record
- 5.6 Configuring Manual Record
- 5.7 Configuring Holiday Record
- 5.8 Configuring Redundant Recording
- 5.9 Configuring HDD Group for Recording
- 5.10 Files Protection
- Chapter 6 Playback
- Chapter 7 Backup
- Chapter 8 Alarm Settings
- Chapter 9 Network Settings
- Chapter 10 HDD Management
- Chapter 11 Camera Settings
- Chapter 12 DVR Management and Maintenance
- Chapter 13 Others
- Appendix

User Manual of Digital Video Recorder
46
Camera (Custom) interface.
Figure 2. 20 Custom Adding IP Camera Interface
2) You can edit the IP address, protocol, management port, and other information of the IP camera to be
added.
If the IP camera to add has not been actiavated, you can activate it from the IP camera list on the camera
management interface.
3) Click Add to add the camera.
For the successfully added IP cameras, the Security status shows the security level of the password of
camera: strong password, weak password and risk password.
Figure 2. 21 Successfully Added IP Cameras
For the DS-7200 series DVR, 1-ch or 2-ch IP cameras can be added, and for the DS-7300/8100/9000
series DVR, 1 more IP camera can be added by disabling 1 analog channel, and up to 32 IP cameras
can be added. Please refer to the following table for the number of connectable IP cameras for
different models.