Dome Network Camera Quick Start Guide
© 2020 Hangzhou Hikvision Digital Technology Co., Ltd. All rights reserved. About this Manual The Manual includes instructions for using and managing the Product. Pictures, charts, images and all other information hereinafter are for description and explanation only. The information contained in the Manual is subject to change, without notice, due to firmware updates or other reasons. Please find the latest version of this Manual at the Hikvision website (http://www.hikvision.com/).
SHALL NOT TAKE ANY RESPONSIBILITIES FOR ABNORMAL OPERATION, PRIVACY LEAKAGE OR OTHER DAMAGES RESULTING FROM CYBER-ATTACK, HACKER ATTACK, VIRUS INSPECTION, OR OTHER INTERNET SECURITY RISKS; HOWEVER, HIKVISION WILL PROVIDE TIMELY TECHNICAL SUPPORT IF REQUIRED. YOU AGREE TO USE THIS PRODUCT IN COMPLIANCE WITH ALL APPLICABLE LAWS, AND YOU ARE SOLELY RESPONSIBLE FOR ENSURING THAT YOUR USE CONFORMS TO THE APPLICABLE LAW.
more of the following measures: —Reorient or relocate the receiving antenna. —Increase the separation between the equipment and receiver. —Connect the equipment into an outlet on a circuit different from that to which the receiver is connected. —Consult the dealer or an experienced radio/TV technician for help FCC conditions This device complies with part 15 of the FCC Rules. Operation is subject to the following two conditions: 1. This device may not cause harmful interference. 2.
Industry Canada ICES-003 Compliance This device meets the CAN ICES-3 (B)/NMB-3(B) standards requirements. This device complies with Industry Canada licence-exempt RSS standard(s). Operation is subject to the following two conditions: (1) this device may not cause interference, and (2) this device must accept any interference, including interference that may cause undesired operation of the device. Le présent appareil est conforme aux CNR d'Industrie Canada applicables aux appareils radioexempts de licence.
Cautions&Warnings These instructions are intended to ensure that the user can use the product correctly to avoid danger or property loss. Laws and Regulations The device should be used in compliance with local laws, electrical safety regulations, and fire prevention regulations. Transportation Keep the device in original or similar packaging while transporting it. Power Supply The power source should meet limited power source or PS2 requirements according to IEC 60950-1 or IEC 623681 standard.
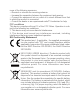
Do not dispose of the battery into fire or a hot oven, or mechanically crush or cut the battery, which may result in an explosion. Do not leave the battery in an extremely high temperature surrounding environment, which may result in an explosion or the leakage of flammable liquid or gas. Do not subject the battery to extremely low air pressure, which may result in an explosion or the leakage of flammable liquid or gas.
Make sure the running environment meets the requirement of the device. The operating temperature shall be -30 °C to 60 °C (-22 °F to 140 °F), and the operating humidity shall be 95% or less (no condensing). DO NOT place the device in extremely hot, cold, dusty or damp locations, and do not expose it to high electromagnetic radiation. White Light Illuminator (If supported) Possibly hazardous optical radiation emitted from this product. DO NOT stare at operating light source. May be harmful to the eyes.
The standard power supply is 12 VDC or PoE, please make sure your power supply matches with your device. Make sure that the power has been disconnected before you wire, install, or disassemble the device. Make sure that no reflective surface is too close to the device lens. The IR light from the device may reflect back into the lens causing reflection. CAUTION: Hot parts! Burned fingers when handling the parts. Wait one-half hour after switching off before handling parts.
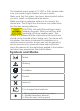
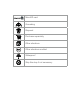
MicroSD card Grounding Disposal Purchase separately Other situations Other situations omitted Waterproof Skip this step if not necessary
1
* 1x 1x PM4x10 PA4x25 3x 1x 1x* T10 1x 2x* 1x 2 1x*
1.1 1.
2.1 A.1-A.3 B.1-B.
A.1 A.2 Ø5.
A.3 PA4x25 5.0 2.
B.1 B.
B.3 Ø5.5mm B.4 PA4x25 2.2 5.
A.3 B.4 2.2 5.
2.
2.
12 3
2.5 PM4x10 5.
3.1 5.
3.2 0° - 75° 3.
3.4 0° - 360° 3.5 5.
4.
4.
RESET microSD Power Interface Alarm Interface Audio Interface Network Interface 19
RESET microSD Power Interface Alarm Interface Audio Interface Aviation Plug 20 5
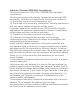
Activate and Access Network Camera Scan the QR code to get Activate and Access Camera. Note that mobile data charges may apply if Wi-Fi is unavailable.
Reset and Restore Camera Press Reset button for about 10s when the camera is powering on or rebooting to restore the default settings, including the user name, password, IP address, port No., etc. For the position of the reset button, refer to the figure in the page 19 or page 20.
UD18998B