
User Manual
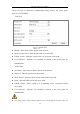


Table Of Contents
- Chapter 1 System Requirement
- Chapter 2 Network Connection
- Chapter 3 Access to the Network Camera
- Chapter 4 Wi-Fi Settings
- Chapter 5 Live View
- Chapter 6 Network Camera Configuration
- Chapter 7 Network Settings
- 7.1 Configuring Basic Settings
- 7.2 Configure Advanced Settings
- 7.2.1 Configuring SNMP Settings
- 7.2.2 Configuring FTP Settings
- 7.2.3 Configuring Email Settings
- 7.2.4 Platform Access
- 7.2.5 Wireless Dial
- 7.2.6 HTTPS Settings
- 7.2.7 Configuring QoS Settings
- 7.2.8 Configuring 802.1X Settings
- 7.2.9 Integration Protocol
- 7.2.10 Bandwidth Adaptation
- 7.2.11 Network Service
- 7.2.12 Smooth Streaming
- Chapter 8 Video/Audio Settings
- Chapter 9 Image Settings
- Chapter 10 Event Settings
- 10.1 Basic Events
- 10.2 Smart Events
- 10.2.1 Configuring Audio Exception Detection
- 10.2.2 Configuring Defocus Detection
- 10.2.3 Configuring Scene Change Detection
- 10.2.4 Configuring Face Detection
- 10.2.5 Configuring Intrusion Detection
- 10.2.6 Configuring Line Crossing Detection
- 10.2.7 Configuring Region Entrance Detection
- 10.2.8 Configuring Region Exiting Detection
- 10.2.9 Configuring Unattended Baggage Detection
- 10.2.10 Configuring Object Removal Detection
- 10.3 VCA Configuration
- Chapter 11 Storage Settings
- Chapter 12 Playback
- Chapter 13 Picture
- Chapter 14 Application
- Appendix

Network Camera User Manual
37
Icon
Description
, , ,
etc.
Live view with the different video streams.
Supported video streams vary according to camera models.
For the camera models that support 10 streams, go to Video/Audio >
Custom to add the streams.
Click to select the third-party plug-in.
Manually capture the picture.
/
Manually start/stop recording.
/
Audio on and adjust volume /Mute.
/
Turn on/off microphone.
/
Start/stop digital zoom function.
/
Start/stop pixel counter
Click the button to display pictures captured by camera.
Note: The function is only available for certain camera models that
support face capture.
Note: The icons vary according to the different camera models.
Pixel Counter:
Steps:
1. Click Start Pixel Counter to enable the function.
2. Drag the mouse on the image to select the desired rectangle area. The width pixel
and height pixel is displayed on the bottom of the web.
3. Click the button again to stop the function.
Note:
The pixel counter is only supported under the main stream and only one rectangle are
supported.
Full-screen Mode:
You can double-click on the live video to switch the current live view into full-screen
or return to normal mode from the full-screen.
Install Plug-in
Certain operation system and web browser may restrict the display and operation of
the camera function. You should install plug-in or complete certain settings to ensure
normal display and operation.