
User Manual
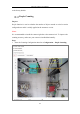
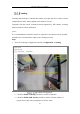
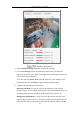
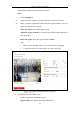
Table Of Contents
- Chapter 1 System Requirement
- Chapter 2 Network Connection
- Chapter 3 Access to the Network Camera
- Chapter 4 Wi-Fi Settings
- Chapter 5 Live View
- Chapter 6 Network Camera Configuration
- Chapter 7 Network Settings
- 7.1 Configuring Basic Settings
- 7.2 Configure Advanced Settings
- 7.2.1 Configuring SNMP Settings
- 7.2.2 Configuring FTP Settings
- 7.2.3 Configuring Email Settings
- 7.2.4 Platform Access
- 7.2.5 Wireless Dial
- 7.2.6 HTTPS Settings
- 7.2.7 Configuring QoS Settings
- 7.2.8 Configuring 802.1X Settings
- 7.2.9 Integration Protocol
- 7.2.10 Bandwidth Adaptation
- 7.2.11 Network Service
- 7.2.12 Smooth Streaming
- Chapter 8 Video/Audio Settings
- Chapter 9 Image Settings
- Chapter 10 Event Settings
- 10.1 Basic Events
- 10.2 Smart Events
- 10.2.1 Configuring Audio Exception Detection
- 10.2.2 Configuring Defocus Detection
- 10.2.3 Configuring Scene Change Detection
- 10.2.4 Configuring Face Detection
- 10.2.5 Configuring Intrusion Detection
- 10.2.6 Configuring Line Crossing Detection
- 10.2.7 Configuring Region Entrance Detection
- 10.2.8 Configuring Region Exiting Detection
- 10.2.9 Configuring Unattended Baggage Detection
- 10.2.10 Configuring Object Removal Detection
- 10.3 VCA Configuration
- Chapter 11 Storage Settings
- Chapter 12 Playback
- Chapter 13 Picture
- Chapter 14 Application
- Appendix

Network Camera User Manual
151
Figure 10-30 People Counting Configuration
2. Check Enable People Counting checkbox to enable the function.
3. Set the detection line.
An orange line, named as detection line can be set on the live video, and the
object entering or exiting through the line will be detected and counted.
1) Click button on the left of the live view image. An orange line will
appear on the image.
2) Drag the detection line to adjust its position.
3) Drag the yellow end points of the detection line to adjust its length.
Note:
• The detection line should be drawn at the position right below the
camera, and it should cover the whole entrance/exit.
• Don’t draw the line at the place where people may linger.
4) You can click to delete the detection line.
5) You can click to change the direction. The yellow arrow indicates the
direction of entering.
4. Check Camera Calibration checkbox to enable camera calibration. A calibration
line (the green vertical line) and several blue horizontal lines appear in the live
view image.
Camera Calibration: You set the width (usually the shoulder breadth) of a
person for counting. Well-set calibration parameters will help increase the
counting accuracy.
Blue Horizontal Lines: One blue line indicates the detected width (usually the
shoulder breadth) of a passing person. Up to eight blue lines can be shown on
each side of the detection line. These lines are reference for calibration setting.
Calibration Line (Green Vertical Line): The distance from the left endpoint to
the calibration line (calibration line width) indicates the set width of a person.
You can drag the calibration line to adjust the distance according to the blue line
distribution.
Advanced: You can precisely adjust the position and the size of detection line
and calibration line.
1) Dragging the cursors or inputting values in the text fields to set the Detection
Line Start Point and the Detection Line End Point.