
User Manual
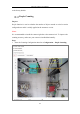
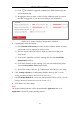
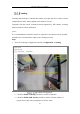
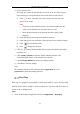
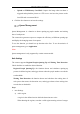
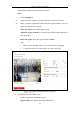
Table Of Contents
- Chapter 1 System Requirement
- Chapter 2 Network Connection
- Chapter 3 Access to the Network Camera
- Chapter 4 Wi-Fi Settings
- Chapter 5 Live View
- Chapter 6 Network Camera Configuration
- Chapter 7 Network Settings
- 7.1 Configuring Basic Settings
- 7.2 Configure Advanced Settings
- 7.2.1 Configuring SNMP Settings
- 7.2.2 Configuring FTP Settings
- 7.2.3 Configuring Email Settings
- 7.2.4 Platform Access
- 7.2.5 Wireless Dial
- 7.2.6 HTTPS Settings
- 7.2.7 Configuring QoS Settings
- 7.2.8 Configuring 802.1X Settings
- 7.2.9 Integration Protocol
- 7.2.10 Bandwidth Adaptation
- 7.2.11 Network Service
- 7.2.12 Smooth Streaming
- Chapter 8 Video/Audio Settings
- Chapter 9 Image Settings
- Chapter 10 Event Settings
- 10.1 Basic Events
- 10.2 Smart Events
- 10.2.1 Configuring Audio Exception Detection
- 10.2.2 Configuring Defocus Detection
- 10.2.3 Configuring Scene Change Detection
- 10.2.4 Configuring Face Detection
- 10.2.5 Configuring Intrusion Detection
- 10.2.6 Configuring Line Crossing Detection
- 10.2.7 Configuring Region Entrance Detection
- 10.2.8 Configuring Region Exiting Detection
- 10.2.9 Configuring Unattended Baggage Detection
- 10.2.10 Configuring Object Removal Detection
- 10.3 VCA Configuration
- Chapter 11 Storage Settings
- Chapter 12 Playback
- Chapter 13 Picture
- Chapter 14 Application
- Appendix

Network Camera User Manual
157
Note: Road traffic function varies according to different camera models.
Detection Configuration
Steps:
1. Select the detection type from the list. Vehicle Detection and Mixed-traffic
Detection are selectable.
Note: Reboot the device to activate the new settings when switching the detection
type of road traffic.
2. Check the checkbox of Enable to enable the selected detection function.
3. Select the lane number in the corresponding dropdown list. Up to 4 lanes are
selectable.
4. Click and drag the lane line to set its position, or click and drag the line end to
adjust the length and angle of the line.
5. Adjust the zoom ratio of the camera so that the size of the vehicle in the image is
close to that of the red frame. Only the position of red frame is adjustable.
Note: Only 1 license plate can be captured at one time for each lane.
6. Select a Province/State Abbreviation in the dropdown list when the attribution of
license plate cannot be recognized.
7. Set the Arming Schedule.
1) Click Arming Schedule to enter the arming schedule interface.
2) Click on the time bar and drag the mouse to select the time period. Click
delete or delete all to delete the configured schedule.
3) Move the mouse to the end of each day, a copy dialogue box pops up, and you
can copy the current settings to other days.
4) Click Save to save the settings.
Note: The time of each period cannot be overlapped. Up to 8 periods can be
configured for each day.
8. Set the linkage method. Notify surveillance center and upload to FTP/Memory
Card/NAS are selectable.
• Notify Surveillance Center: Send an exception or alarm signal to remote
management software when an event occurs.