
User Manual

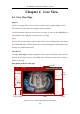
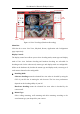
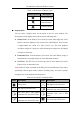
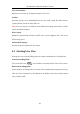
Table Of Contents
- Chapter 1 System Requirement
- Chapter 2 Network Connection
- Chapter 3 Access to the Network Camera
- Chapter 4 Live View
- Chapter 5 Network Camera Configuration
- 5.1 Configuring Local Parameters
- 5.2 Configuring System Settings
- 5.2.1 Viewing Basic Information
- 5.2.2 Time and DST Settings
- 5.2.3 RS-232 Settings
- 5.2.4 RS-485 Settings
- 5.2.5 Upgrade and Maintenance
- 5.2.6 Log Searching
- 5.2.7 System Service Settings
- 5.2.8 Authentication
- 5.2.9 IP Address Filter
- 5.2.10 Security Service
- 5.2.11 User Management
- 5.2.12 Open Source Software License
- 5.3 Configuring Network Settings
- 5.3.1 Configuring TCP/IP Settings
- 5.3.2 Configuring Port Settings
- 5.3.3 Configuring PPPoE Settings
- 5.3.4 Configuring DDNS Settings
- 5.3.5 Configuring NAT (Network Address Translation) Settings
- 5.3.6 Configuring SNMP Settings
- 5.3.7 Configuring FTP Settings
- 5.3.8 Email Settings
- 5.3.9 Configuring HTTPS Settings
- 5.3.10 Configuring QoS Settings
- 5.3.11 Configuring 802.1X Settings
- 5.4 Configuring Video and Audio Settings
- 5.5 Configuring Image Parameters
- 5.6 Configuring Event Settings
- 5.7 Configuring Heat Map
- Chapter 6 Storage Settings
- Chapter 7 Playback
- Chapter 8 Picture
- Chapter 9 Application
- Appendix

User Manual of Network Fisheye Camera
28
Live View Window:
Display the live video on the display window of live view.
Toolbar:
Start/Stop the live view, enable/disable the two-way audio, adjust the audio volume,
capture pictures, record the video files, etc..
Note: Icons on tool bar are different under different decoding mode. Refer to Table
4-4 for detailed description.
PTZ Control:
Realize the pan/tilt/zoom function of PTZ view via the navigation box, and set the
PTZ moving speed.
Preset/Patrol Settings:
Set and call the preset/patrol for the camera.
4.2 Starting Live View
Starting live view under decoding modes of software and hardware is a bit different.
Software Decoding Mode:
You can click the icon / on the toolbar to start/stop all live view of the camera.
Hardware Decoding Mode:
Under hardware decoding mode, live video will be automatically displayed when you
click Live View on menu bar, click Hardware in display control area, change mount
type or display mode.