
User Manual
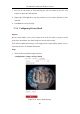
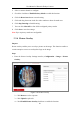
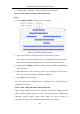

Table Of Contents
- Chapter 1 System Requirement
- Chapter 2 Network Connection
- Chapter 3 Access to the Network Camera
- Chapter 4 Live View
- Chapter 5 Network Camera Configuration
- 5.1 Configuring Local Parameters
- 5.2 Configuring System Settings
- 5.2.1 Viewing Basic Information
- 5.2.2 Time and DST Settings
- 5.2.3 RS-232 Settings
- 5.2.4 RS-485 Settings
- 5.2.5 Upgrade and Maintenance
- 5.2.6 Log Searching
- 5.2.7 System Service Settings
- 5.2.8 Authentication
- 5.2.9 IP Address Filter
- 5.2.10 Security Service
- 5.2.11 User Management
- 5.2.12 Open Source Software License
- 5.3 Configuring Network Settings
- 5.3.1 Configuring TCP/IP Settings
- 5.3.2 Configuring Port Settings
- 5.3.3 Configuring PPPoE Settings
- 5.3.4 Configuring DDNS Settings
- 5.3.5 Configuring NAT (Network Address Translation) Settings
- 5.3.6 Configuring SNMP Settings
- 5.3.7 Configuring FTP Settings
- 5.3.8 Email Settings
- 5.3.9 Configuring HTTPS Settings
- 5.3.10 Configuring QoS Settings
- 5.3.11 Configuring 802.1X Settings
- 5.4 Configuring Video and Audio Settings
- 5.5 Configuring Image Parameters
- 5.6 Configuring Event Settings
- 5.7 Configuring Heat Map
- Chapter 6 Storage Settings
- Chapter 7 Playback
- Chapter 8 Picture
- Chapter 9 Application
- Appendix

User Manual of Network Fisheye Camera
86
Figure 5-46 Linkage Method Settings
Audible Warning
Trigger the audible warning locally. And it only supported by the device that
has the audio output.
Notify Surveillance Center: Send an exception or alarm signal to remote
management software when an event occurs.
Send Email: Send an email with alarm information to a user or users when
an event occurs.
Note: To send the Email when an event occurs, please refer to Section 5.3.8
to complete Email setup in advance.
Upload to FTP/Memory Card/NAS: Capture the image when an alarm is
triggered and upload the picture to the configured FTP server, memory card
and NAS.
Notes:
• Set the FTP address and the remote FTP server first. Refer to Section
5.3.7 Configuring FTP Settings for detailed information.
• The captured image can also be uploaded to the available memory card
or network disk (NAS). Go to Configuration > Storage > Storage
Management to set the memory card and NAS.
• Go to Configuration > Storage > Schedule Settings > Capture >
Capture Parameters page, enable the event-triggered snapshot, and set
the capture interval and capture number.