
User Manual


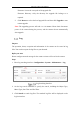
Table Of Contents
- Chapter 1 System Requirement
- Chapter 2 Network Connection
- Chapter 3 Access to the Network Camera
- Chapter 4 Live View
- Chapter 5 Network Camera Configuration
- Chapter 6 Network Settings
- Chapter 7 Video/Audio Settings
- Chapter 8 Image Settings
- Chapter 9 Event Settings
- 9.1 Basic Events
- 9.2 Smart Events
- 9.2.1 Configuring Audio Exception Detection
- 9.2.2 Configuring Defocus Detection
- 9.2.3 Configuring Scene Change Detection
- 9.2.4 Configuring Intrusion Detection
- 9.2.5 Configuring Line Crossing Detection
- 9.2.6 Configuring Region Entrance Detection
- 9.2.7 Configuring Region Exiting Detection
- 9.2.8 Configuring Unattended Baggage Detection
- 9.2.9 Configuring Object Removal Detection
- Chapter 10 Storage Settings
- Chapter 11 Playback
- Chapter 12 Picture
- Appendix

Network Camera User Manual
28
Configuring External Devices
Purpose:
For the device supported external devices, including the wiper on the housing or the
LED light, you can control them via the Web browser. External devices vary
according to the different camera models.
Steps:
1. Enter the External Device configuration interface.
Configuration > System > System Settings > External Device
External Device Settings
2. Check the Enable Supplement Light checkbox to enable the LED Light.
3. Move the slider to adjust the low beam brightness and high bean brightness.
4. Select the mode for LED light. Timing and Auto are selectable.
Timing: The LED will be turned on by the schedule you set. You should set
the Start Time and End Time.
Set Schedule
Auto: The LED will be turned on according to the environment illumination.
5. Click Save to save the settings.