
User Manual


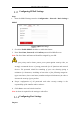


Table Of Contents
- Chapter 1 System Requirement
- Chapter 2 Network Connection
- Chapter 3 Access to the Network Camera
- Chapter 4 Live View
- Chapter 5 Network Camera Configuration
- Chapter 6 Network Settings
- Chapter 7 Video/Audio Settings
- Chapter 8 Image Settings
- Chapter 9 Event Settings
- 9.1 Basic Events
- 9.2 Smart Events
- 9.2.1 Configuring Audio Exception Detection
- 9.2.2 Configuring Defocus Detection
- 9.2.3 Configuring Scene Change Detection
- 9.2.4 Configuring Intrusion Detection
- 9.2.5 Configuring Line Crossing Detection
- 9.2.6 Configuring Region Entrance Detection
- 9.2.7 Configuring Region Exiting Detection
- 9.2.8 Configuring Unattended Baggage Detection
- 9.2.9 Configuring Object Removal Detection
- Chapter 10 Storage Settings
- Chapter 11 Playback
- Chapter 12 Picture
- Appendix

Network Camera User Manual
43
Figure 6-2 DynDNS Settings
NO-IP:
Steps:
(1) Choose the DDNS Type as NO-IP.
Figure 6-3 NO-IP DNS Settings
(2) Enter the Server Address as www.noip.com
(3) Enter the Domain name you registered.
(4) Enter the User Name and Password.
(5) Click Save and then you can view the camera with the domain name.
Note: Reboot the device to make the settings take effect.