
Operation Manual


User Manual of Network Camera
© Hikvision Digital Technology Co., Ltd. All Rights Reserved.
63
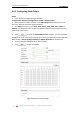
6.6.8 Configuring Snapshot Settings
Purpose:
You can configure the scheduled snapshot and event-triggered snapshot. The
captured picture can be stored in the SD card (if supported) or the netHDD (For
detailed information about netHDD, please refer to Section 7.1 Configuring NAS
Settings). You can also upload the captured pictures to a FTP server.
Basic Settings
Steps:
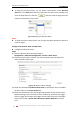
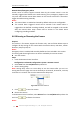
1. Enter the Snapshot Settings interface:
Configuration > Advanced Configuration > Events > Snapshot
2. Check the Enable Timing Snapshot checkbox to enable continuous snapshot.
Check the Enable Event-triggered Snapshot checkbox to check event-triggered
snapshot.
3. Select the quality of the snapshot.
4. Set the time interval between two snapshots.
5. Click to save the settings.
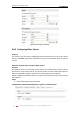
Uploading to FTP
You can follow below configuration instructions to upload the snapshots to FTP.
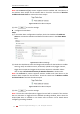
Upload continuous snapshots to FTP
Steps:
1) Configure the FTP settings and check checkbox in FTP
Settings interface. Please refer to Section 6.3.8 Configuring FTP Settings for more
details to configure FTP parameters.
2) Check the Enable Timing Snapshot checkbox.
Upload event-triggered snapshots to FTP
Steps:
1) Configure the FTP settings and check checkbox in FTP
Settings interface. Please refer to Section 6.3.8 Configuring FTP Settings for more
details to configure FTP parameters.
2) Check checkbox in Motion Detection Settings or Alarm Input
interface. Please refer to Step 3 Set the Alarm Actions Taken for Motion
Detection in Section 6.6.1, or Step 4 Configuring External Alarm Input in Section
6.6.4.
3) Check the Enable Event-triggered Snapshot checkbox.