
User Manual
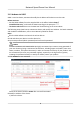
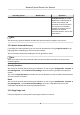
Table Of Contents
- Initiatives on the Use of Video Products
- Legal Information
- Chapter 1 Overview
- Chapter 2 Device Activation and Accessing
- Chapter 3 Smart Function
- Chapter 4 PTZ
- Chapter 5 Live View
- 5.1 Live View Parameters
- 5.1.1 Start and Stop Live View
- 5.1.2 Aspect Ratio
- 5.1.3 Live View Stream Type
- 5.1.4 Quick Set Live View
- 5.1.5 Select the Third-Party Plug-in
- 5.1.6 Start Digital Zoom
- 5.1.7 Conduct Regional Focus
- 5.1.8 Conduct Regional Exposure
- 5.1.9 Count Pixel
- 5.1.10 Light
- 5.1.11 Lens Initialization
- 5.1.12 Track Manually
- 5.1.13 Conduct 3D Positioning
- 5.2 Set Transmission Parameters
- 5.1 Live View Parameters
- Chapter 6 Video and Audio
- Chapter 7 Video Recording and Picture Capture
- Chapter 8 Event and Alarm
- Chapter 9 Arming Schedule and Alarm Linkage
- Chapter 10 Network Settings
- 10.1 TCP/IP
- 10.2 Port
- 10.3 Port Mapping
- 10.4 SNMP
- 10.5 Access to Device via Domain Name
- 10.6 Access to Device via PPPoE Dial Up Connection
- 10.7 Accessing via Mobile Client
- 10.8 Set ISUP
- 10.9 Set Open Network Video Interface
- 10.10 Set Network Service
- 10.11 Set Alarm Server
- 10.12 TCP Acceleration
- 10.13 Traffic Shaping
- 10.14 Set SRTP
- Chapter 11 System and Security
- 11.1 View Device Information
- 11.2 Restore and Default
- 11.3 Search and Manage Log
- 11.4 Import and Export Configuration File
- 11.5 Export Diagnose Information
- 11.6 Reboot
- 11.7 Upgrade
- 11.8 View Open Source Software License
- 11.9 Set Live View Connection
- 11.10 Time and Date
- 11.11 Set RS-485
- 11.12 Security
- Appendix A. Device Command
- Appendix B. Device Communication Matrix

2) Change the device IP address to the same subnet as your computer by either modifying the IP
address manually or checking Enable DHCP.
3) Input the admin password and click Modify to acvate your IP address modicaon.
2.2 Access Device via Web Browser
Before You Start
Check the system requirement to conrm that the operang computer and web browser meets
the requirements. See
System Requirement .
Steps
1.
Open the web browser.
2.
Input IP address of the device to enter the login interface.
3.
Input user name and password.
Note
Illegal login lock is acvated by default. If admin user performs seven failed password aempts
(ve aempts for user/operator), the IP address is blocked for 30 minutes.
If illegal login lock is not needed, go to Conguraon → System → Security → Security Service
to turn it
o.
4.
Click Login.
5.
Download and install appropriate plug-in for your web browser.
For IE based web browser, webcomponents and QuickTime
TM
are
oponal. For non-IE based web
browser, webcomponents, QuickTime
TM
, VLC and MJEPG are oponal.
2.2.1 Plug-in
Installaon
Certain operaon systems and web browser may restrict the display and operaon of the device
funcon. You should install plug-in or complete certain sengs to ensure normal display and
operaon. For detailed restricted funcon, refer to the actual device.
Operang
System Web Browser Operaon
Windows Internet Explorer 10+ Follow pop-up prompts to
complete plug-in installaon.
Windows 7 and above version Google Chrome 57+
Mozilla Firefox 52+
Click to
download and install plug-in.
Mac OS Google Chrome 57+
Mozilla Firefox 52+
Mac Safari 12+
Plug-in installaon is not
required.
Go to Conguraon →
Network → Advanced
Sengs
Network Speed Dome User Manual
5