
Quick Start Guide


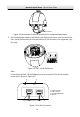


Table Of Contents
- 1 Overview
- 1.1 Speed Dome Overview
- 1.1.1 Overview of Type I Speed Dome
- 1.1.2 Overview of Type II Speed Dome
- 1.1.3 Overview of Type III Speed Dome
- 1.1.4 Overview of Type IV Speed Dome
- 1.1.5 Overview of Type V Speed Dome
- 1.1.6 Overview of Type VI Speed Dome
- 1.1.7 Overview of Type VII Speed Dome
- 1.1.8 Overview of Type VIII Speed Dome
- 1.1.9 Overview of Type IX Speed Dome
- 1.2 Cable Interfaces
- 1.3 Alarm Output
- 1.1 Speed Dome Overview
- 2 Installation
- 2.1 Installing Type I Speed Dome
- 2.2 Installing Type II Speed Dome
- 2.3 Installing Type III Speed Dome
- 2.4 Installing Type IV Speed Dome
- 2.5 Installing Type V Speed Dome
- 2.6 Installing Type VI and VII Speed Dome
- 2.7 Installing Type VIII Speed Dome
- 2.8 Installing Type IX Speed Dome
- 2.9 Installation of Network Cable Waterproof Jacket
- 2.10 Installation of Water-proof Tape
- 2.11 Protective Measures for Outdoor Installation
- 3 Activate and Access Network Camera

Network Speed Dome·Quick Start Guide
10
Connecting Hi-PoE
Steps:
1) Connect the Hi-PoE module to the Internet via the DATA IN interface with a
network cable.
2) Connect the Hi-PoE module to the speed dome via the DATA & POWER OUT
interface with a network cable.
3) Power on the Hi-PoE module.
4. Install the memory card.
5. Align the cuts on the bubble with the lock screws on the back box to reinstall the
bubble. Tighten the lock screws.
6. Install the bracket.
1). Drill four screw holes in the wall according to the holes on the bracket, and then
insert four M8 expansion screws into the mounting holes.
2). Attach the gasket and the bracket to the wall by aligning the four screw holes on
the bracket with four expansion screws on the wall.
3). Secure the bracket with four hex nuts and washers.
Figure 2-7 Secure the Bracket
7. Install the speed dome to the bracket.
1). Hang the safety rope to the speed dome and the hook on the bracket as shown
in Figure 2-8.
2). Route the speed dome cables through the bracket.
3). Connect the corresponding cables.
Safety Rope
Figure 2-8 Hang the Safety Rope