
User Manual
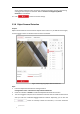
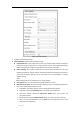
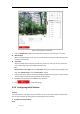
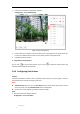
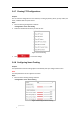
Table Of Contents
- Chapter 1 Overview
- Chapter 2 Network Connection
- Chapter 3 Accessing to the Network Speed Dome
- Chapter 4 Basic Operations
- Chapter 5 System Configuration
- 5.1 Storage Settings
- 5.2 Basic Event Configuration
- 5.3 Smart Event Configuration
- 5.4 PTZ Configuration
- 5.4.1 Configuring Basic PTZ Parameters
- 5.4.2 Configuring PTZ Limits
- 5.4.3 Configuring Initial Position
- 5.4.4 Configuring Park Actions
- 5.4.5 Configuring Privacy Mask
- 5.4.6 Configuring Scheduled Tasks
- 5.4.7 Clearing PTZ Configurations
- 5.4.8 Configuring Smart Tracking
- 5.4.9 Prioritize PTZ
- 5.4.10 Position Settings
- 5.4.11 Rapid Focus
- 5.5 Face Capture Configuration
- Chapter 6 Camera Configuration
- Appendix

© Hikvision
2. Click the PTZ control buttons to find the area you want to set the privacy mask.
3. Click ; drag the mouse in the live video window to draw the area.
4. You can drag the corners of the red rectangle area to draw a polygon mask.
5. Click to finish drawing or click to clear all of the areas you set without
saving them.
6. Click to save the privacy mask, and it will be listed in the Privacy Mask List area.
7. Modify the mask settings.
Type: you can specify a desired color for the mask or set it as mosaic.
Note:
The mosaic option may not be supported by certain camera models.
Active Zoom Ratio: The set mask is only valid when the camera zoom ratio is equal to
or larger than the set value. Click to check or change current zoom ratio (The
zoom ratio value is displayed on image).
Figure 5-34 Privacy Mask List
8. Check the checkbox of Enable Privacy Mask to enable this function.
5.4.6 Configuring Scheduled Tasks
Purpose:
You can configure the network speed dome to perform a certain action automatically in a
user-defined time period.
Steps:
1. Enter the Scheduled Task settings interface:
Configuration> PTZ > Scheduled Tasks