Explosion-Proof Thermal Network Bullet Camera Quick Start Guide 0
Thermal Bullet Camera·Quick Start Guide © 2021 Hangzhou Hikvision Digital Technology Co., Ltd. All rights reserved. About this Manual The Manual includes instructions for using and managing the Product. Pictures, charts, images and all other information hereinafter are for description and explanation only. The information contained in the Manual is subject to change, without notice, due to firmware updates or other reasons. Please find the latest version of this Manual at the Hikvision website (https://www.
Thermal Bullet Camera·Quick Start Guide BUSINESS INTERRUPTION, OR LOSS OF DATA, CORRUPTION OF SYSTEMS, OR LOSS OF DOCUMENTATION, WHETHER BASED ON BREACH OF CONTRACT, TORT (INCLUDING NEGLIGENCE), PRODUCT LIABILITY, OR OTHERWISE, IN CONNECTION WITH THE USE OF THE PRODUCT, EVEN IF HIKVISION HAS BEEN ADVISED OF THE POSSIBILITY OF SUCH DAMAGES OR LOSS.
Thermal Bullet Camera·Quick Start Guide IN THE EVENT OF ANY CONFLICTS BETWEEN THIS MANUAL AND THE APPLICABLE LAW, THE LATER PREVAILS.
Thermal Bullet Camera·Quick Start Guide Regulatory Information FCC Information Please take attention that changes or modification not expressly approved by the party responsible for compliance could void the user’s authority to operate the equipment. FCC compliance: This equipment has been tested and found to comply with the limits for a Class A digital device, pursuant to part 15 of the FCC Rules.
Thermal Bullet Camera·Quick Start Guide Directive 2014/35/EU, the RoHS Directive 2011/65/EU, the ATEX Directive 2014/34/EU. 2012/19/EU (WEEE directive): Products marked with this symbol cannot be disposed of as unsorted municipal waste in the European Union. For proper recycling, return this product to your local supplier upon the purchase of equivalent new equipment, or dispose of it at designated collection points. For more information see: www.recyclethis.
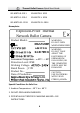
Thermal Bullet Camera·Quick Start Guide IEC 60079-0: 2011 EN 60079-0: 2012 IEC 60079-1: 2014 EN 60079-1: 2014 IEC 60079-31: 2013 EN 60079-31: 2014 Nameplate: Explosion-Proof Thermal Network Bullet Camera Product Model: WARNING: DO NOT OPEN WHEN ENERGIZED WARNING: DO NOT TAKE APART THE FASTENERS OF GERMANIUM GLASS RING,OR THE CEMENTED JOINTS MAY BE DAMAGED Environment Temperature: 40℃~﹢60℃ Protection Level: IP68 Working Voltage: Rated Power:≤15W Product No.
Thermal Bullet Camera·Quick Start Guide 4. When assembly, operation and maintenance, the operator must follow the requirements of the IEC 60079-14: latest version Explosive atmosphere- Part 14: Electrical installation design, selection and erection, beside of the manufacturer’s operation instruction or its National equivalent. 5. Repair and overhaul shall comply with IEC 60079-19: latest version or its National equivalent.
Thermal Bullet Camera·Quick Start Guide Symbol Caution Note Description Indicates a potentially hazardous situation which, if not avoided, could result in equipment damage, data loss, performance degradation, or unexpected results. Provides additional information to emphasize or supplement important points of the main text. Safety Instruction These instructions are intended to ensure that user can use the product correctly to avoid danger or property loss.
Thermal Bullet Camera·Quick Start Guide Power Supply ● ● ● ● ● ● ● ● ● ● ● Please purchase the charger by yourself. Input voltage should meet the Limited Power Source (100-240 VAC) according to the IEC62368 standard. Please refer to technical specifications for detailed information. Make sure the plug is properly connected to the power socket. The socket-outlet shall be installed near the equipment and shall be easily accessible.
Thermal Bullet Camera·Quick Start Guide Battery ● ● ● ● ● ● ● ● Risk of explosion if the battery is replaced by an incorrect type. Dispose of used batteries according to the instructions. Il y a risque d'explosion si la batterie est remplacée par une batterie de type incorrect. Mettre au rebut les batteries usagées conformément aux instructions. The built-in battery cannot be dismantled. Please contact the manufacture for repair if necessary.
Thermal Bullet Camera·Quick Start Guide ● equipment may fall, causing serious personal injury or death. This equipment is for use only with corresponding brackets. Use with other (carts, stands, or carriers) may result in instability causing injury.
Thermal Bullet Camera·Quick Start Guide ● ● ● ● Wipe the device gently with a clean cloth and a small quantity of ethanol, if necessary. If the equipment is used in a manner not specified by the manufacturer, the protection provided by the device may be impaired. To reduce the risk of fire, replace only with the same type and rating of fuse. The serial port of the equipment is used for debugging only.
Thermal Bullet Camera·Quick Start Guide Emergency ● If smoke, odor, or noise arises from the device, immediately turn off the power, unplug the power cable, and contact the service center. COMPLIANCE NOTICE: The thermal series products might be subject to export controls in various countries or regions, including without limitation, the United States, European Union, United Kingdom and/or other member countries of the Wassenaar Arrangement.
Thermal Bullet Camera·Quick Start Guide Table of Contents 1 Introduction .................................................................................. 15 1.1 Overview ....................................................................... 15 1.2 Model Description......................................................... 15 2 Appearance Description ............................................................... 17 2.1 Camera Overview .......................................................... 17 2.
Thermal Bullet Camera·Quick Start Guide 1 Introduction 1.1 Overview Explosion-proof network camera is a surveillance product capable of video/audio collecting, smart encoding and network transmitting. It adopts an embedded system and a high-performed hardware process platform to achieve good stability and reliability. You can visit and configure your camera via web browser and client software.
Thermal Bullet Camera·Quick Start Guide Explanation of model naming: DS-2 T D 2 4 X X/XT - X X Explosion-proof camera Lens focal length (mm): 9: 9 mm 25: 25 mm Stands for hardware performance, including platform, sensor, etc.. Larger number means better performance Max. Resolution (MP): 6: 0.
Thermal Bullet Camera·Quick Start Guide 2 Appearance Description 2.1 Camera Overview See the figure below for 3 2 4 1 Overview of Type I Camera Table 2-1 Description of Type I Camera No.
Thermal Bullet Camera·Quick Start Guide 2.2 Cable Description 1 2 3 4 5 6 7 Figure 2-2 Overview of Cables Table 2-2 Description of Cables No.
Thermal Bullet Camera·Quick Start Guide 7 Power cord (85 VAC to 264 VAC) 19
Thermal Bullet Camera·Quick Start Guide 3 Installation Before you start: ● Make sure the device in the package is in good condition and all the assembly parts are included. ● The standard power supply is 85 to 264 VAC, please make sure your power supply matches with your camera. ● Make sure all the related equipment is power-off during the installation. ● Check the specification of the products for the installation environment.
Thermal Bullet Camera·Quick Start Guide 166 mm [6.54''] Φ12mm [Φ0.47''] 90 mm [3.55''] Figure 3-1 Dimension of a Wall Mounting Bracket Steps: 1. Disassemble the PT joint and the bracket plate. PT Joint Top PT Joint Bottom Figure 3-2 PT Joint 2. Install the bracket plate onto the wall with M12 screws.
Thermal Bullet Camera·Quick Start Guide Figure 3-3 Bracket Plate 3. Install the PT joint top to the mounting base of the camera with four UNC1/4 screws. Figure 3-4 Install PT Joint with Camera 4. Drill four holes in the wall with a Φ12 drill.
Thermal Bullet Camera·Quick Start Guide 5. Attach the bracket on the wall, and then drill four M8 metal expansion screw. Figure 3-5 Drill Expansion Screws 6. Loosen the screws and adjust the panning position of the PT joint. Panning Range [-45° to +45°] Figure 3-6 Screw the PT Joint to Wall Mounting Bracket 3.
Thermal Bullet Camera·Quick Start Guide 1. Align the screw holes on PT joint top with those on PT joint bottom. Figure 3-7 Assemble the PT Joints 2. Hook the safety rope of the camera onto the bracket. 3. Adjust the tilting position of the camera, and fix the camera to the bracket.
Thermal Bullet Camera·Quick Start Guide Figure 3-8 Install the Camera with Bracket 4. Route the cable through the explosion-proof tube.
Thermal Bullet Camera·Quick Start Guide Figure 3-9 Explosion-proof Tube 3.3 Junction Box Installation Steps: 1. Attach the junction box onto the wall, and mark the four screw sites with pencil. 2. Drill four screw holes on the wall (M6 screw, depth: 7mm). 3. Use the Allen wrench to secure the junction box on the wall with four screws.
Thermal Bullet Camera·Quick Start Guide Figure 3-10 Secure the Junction Box 4. Loosen the screws to disassemble the junction box cover. 5. Loosen the cable glands and keep the glands aside.
Thermal Bullet Camera·Quick Start Guide Cable Gland Screw Figure 3-11 Disassemble the Junction Box 6. Connect the cables. 1). Route the camera cables through the top cable gland and insert them into the junction box. 2). Route the external cables through the bottom cable gland and insert them into the junction box. 3). Poke through the sealing ring, and use the sealing rings to cover the cables. 4). Connect the power cables with the connector, and then connect the video cables.
Thermal Bullet Camera·Quick Start Guide Top Cable Gland Sealing Ring Bottom Cable Gland Figure 3-12 Connect Cables 7. Cover the junction box with the screws.
Thermal Bullet Camera·Quick Start Guide Figure 3-13 Cover the Junction Box 8. Seal the junction box. 1). Insert the T-shaped plug into the sealing ring. 2). Fix the cable gland to seal the junction box.
Thermal Bullet Camera·Quick Start Guide Result: The Installation is complete, see the figure below.
Thermal Bullet Camera·Quick Start Guide 4 Setting the Network Camera over the LAN Note: You shall acknowledge that the use of the product with Internet access might be under network security risks. For avoidance of any network attacks and information leakage, please strengthen your own protection. If the product does not work properly, contact your dealer or the nearest service center for help. Wiring Connect the camera to network according to the following figures.
Thermal Bullet Camera·Quick Start Guide Activating the Camera You are required to activate the camera first by setting a strong password for it before you can use the camera. Activation via Web Browser, Activation via SADP, and Activation via Client Software are all supported. We will take activation via SADP software and Activation via Web Browser as examples to introduce the camera activation. Note: Refer to the User Manual of Network Camera for Activation via Client Software.
Thermal Bullet Camera·Quick Start Guide Activation Interface(Web) 3. Create a password and input the password into the password field. STRONG PASSWORD RECOMMENDED– We highly recommend you create a strong password of your own choosing (using a minimum of 8 characters, including upper case letters, lower case letters, numbers, and special characters) in order to increase the security of your product.
Thermal Bullet Camera·Quick Start Guide Follow the steps to activate the camera. Steps: 1. Run the SADP software to search the online devices. 2. Check the device status from the device list, and select the inactive device. Select inactive device. Input and confirm password. SADP Interface Note: The SADP software supports activating the camera in batch. Refer to the user manual of SADP software for details. 3. Create and input the new password in the password field, and confirm the password.
Thermal Bullet Camera·Quick Start Guide STRONG PASSWORD RECOMMENDED– We highly recommend you create a strong password of your own choosing (using a minimum of 8 characters, including upper case letters, lower case letters, numbers, and special characters) in order to increase the security of your product. And we recommend you reset your password regularly, especially in the high security system, resetting the password monthly or weekly can better protect your product.
Thermal Bullet Camera·Quick Start Guide Steps: 1. Run the SADP software. 2. Select an active device. 3. Change the device IP address to the same subnet with your computer by either modifying the IP address manually or checking the checkbox of Enable DHCP.
Thermal Bullet Camera·Quick Start Guide Note: You can enable the Hik-Connect service for the device during activation. Refer to Chapter 6.1 for detailed information. 4. Input the admin password and click Modify to activate your IP address modification. The batch IP address modification is supported by the SADP. Refer to the user manual of SADP for details.
Thermal Bullet Camera·Quick Start Guide 5 Accessing via Web Browser System Requirement: Operating System: Microsoft Windows XP SP1 and above version CPU: 2.0 GHz or higher RAM: 1G or higher Display: 1024×768 resolution or higher Web Browser: Internet Explorer 8.0 and above version, Apple Safari 5.0.2 and above version, Mozilla Firefox 5.0 and above version and Google Chrome 18 and above version Steps: 1. Open the web browser. 2.
Thermal Bullet Camera·Quick Start Guide 4. Click Login. Login Interface 5. Install the plug-in before viewing the live video and managing the camera. Follow the installation prompts to install the plug-in. Note: You may have to close the web browser to finish the installation of the plug-in. Download Plug-in 6. Reopen the web browser after the installation of the plug-in and repeat steps 2 to 4 to login.
Thermal Bullet Camera·Quick Start Guide 6 Operating via Hik-Connect App Purpose: Hik-Connect is an application for mobile devices. With the App, you can view live image of the camera, receive alarm notification and so on. Note: Hik-Connect service is not supported by certain camera models. 6.1 Enable Hik-Connect Service on Camera Purpose: Hik-Connect service should be enabled on your camera before using the service. You can enable the service through SADP software or web browser.
Thermal Bullet Camera·Quick Start Guide Verification Code Setting (SADP) Note: The verification code is required when you add the camera to HikConnect app. 3. Click and read "Terms of Service" and "Privacy Policy". 4. Confirm the settings. Enable Hik-Connect Service via Web Browser Before you start: You need to activate the camera before enabling the service. Refer to Chapter 4.2.
Thermal Bullet Camera·Quick Start Guide Steps: 1. Access the camera via web browser. Refer to Chapter 5. 2. Enter platform access configuration interface: Configuration > Network > Advanced Settings > Platform Access Platform Access Configuration (Web) 3. Select Platform Access Mode as Hik-Connect. 4. Check the checkbox of Enable. 5. Click and read "Terms of Service" and "Privacy Policy" in pop-up window. 6. Create a verification code or change the verification code for the camera.
Thermal Bullet Camera·Quick Start Guide 6.2 Hik-Connect Setup Steps: 1. Download and install the Hik-Connect app by searching “HikConnect” in App Store or Google PlayTM. 2. Launch the app and register for a Hik-Connect user account. 3. Log in Hik-Connect app after registration. 6.3 Adding Camera to Hik-Connect Before you start: You need to enable the Hik-Connect service on camera before adding it to your Hik-Connect account. Refer to Chapter 6.1. Steps: 1.
Thermal Bullet Camera·Quick Start Guide You can find the QR code on the camera or on the cover of the Quick Start Guide of the camera in the package. Figure 6-4 Scan QR Code Note: If the QR code is missing or too blur to be recognized, you can also add the camera by tapping the icon and inputting the camera's serial number. 3. Input the verification code of your camera. Note: ● The required verification code is the code you create or change when you enabling Hik-Connect service on camera.
Thermal Bullet Camera·Quick Start Guide 6.4 Initializing the Memory Card Check the memory card status by tapping on the Storage Status in the Device Settings interface. If the memory card status displays as Uninitialized, tap to initialize it. The status will then change to Normal. You can then start recording any event triggered video in the camera such as motion detection.
UD22502B 0