
User Manual
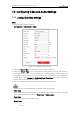


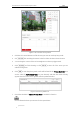
Table Of Contents
- Chapter 1 Overview
- Chapter 2 Network Connection
- Chapter 3 Access to the Network Speed dome
- Chapter 4 Basic Operations
- Chapter 5 System Configuration
- Chapter 6 VCA Configuration
- Chapter 7 Speed dome Configuration
- 7.1 Configuring Network Settings
- 7.2 Configuring Video and Audio Settings
- 7.3 PTZ Configuration
- 7.4 Configuring Image Settings
- 7.5 Configuring System Settings
- Appendix

User Manual of Thermal Network Speed dome
© Hikvision
103
Figure 7-29 Draw the Privacy Mask
2. Click the PTZ control buttons to find the area you want to set the privacy mask.
3. Click ; click and drag the mouse in the live video window to draw the area.
4. You can drag the corners of the red rectangle area to draw a polygon mask.
5. Click to finish drawing or click to clear all of the areas you set
without saving them.
6. Click to save the privacy mask, and it will be listed in the Privacy Mask List area;
set the value of Active Zoom Ratio on your demand, and then the mask will only
appear when the zoom ratio is greater than the predefined value.
Figure 7-30 Privacy Mask List
7. Check the checkbox of Enable Privacy Mask to enable this function.
You are allowed to draw up to 8 areas for the speed dome.