
Quick Start Guide
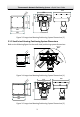
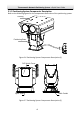

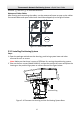

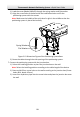

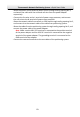
Table Of Contents

Thermometric Network Positioning System
·Quick Start Guide
10
1). Lead the screw (Model: M8×45) through the spring washer and flat washer.
2). Align the screw holes of the base with the installation holes and fix the
positioning system with the screws.
Note: Make sure the bubble of the spirit level is right in the middle so that the
positioning system is placed horizontally.
Spring Washer
Flat Washer
Figure 2-13 Dimension Figure of the Positioning System Base
3). Route the cables through the side opening of the positioning system.
7. Connect the positioning system with the junction box.
1). Select the installing position to place the junction box on the wall.
Note: Select the installing position according to the cable length of the device.
2). Draw and drill four screw holes on the wall according to the junction box (Screw
holes: Φ14, depth: 45mm).
3). Insert four expansion pipes into the screw holes and place the junction box onto
the wall.