
User Manual


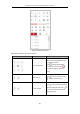


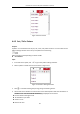
Table Of Contents
- Chapter 1 Overview
- Chapter 2 Network Connection
- Chapter 3 Access to the Network Device
- Chapter 4 Basic Operations
- Chapter 5 System Configuration
- Chapter 6 VCA Configuration
- Chapter 7 Device Configuration
- 7.1 Configure Network Settings
- 7.2 Configure Video and Audio Settings
- 7.3 Configure Image Settings
- 7.4 Configure System Settings
- Appendix

User Manual of Thermal Bi-spectrum Network PTZ Device
27
Click and it displays . Click to enable two-way audio and the icon turns
into . Click the icon again to stop two-way audio.
Click to start live view and the icon turns into . Click the icon again to stop live view.
Click to capture the picture.
Click to start recording and the icon turns into . Click the icon again to stop
recording.
Click to switch between the optical channel and thermal channel when selecting 1 ×
1 live view window.
Click the on the toolbar to go to the. regional focus operation mode and the icon turns
into . Then click and drag the mouse to draw a rectangle on the image as the desired
focus region.
Click to display the . Drag the slider to adjust the volumn.
Click to show full screen of live view, press Esc to exit.
Before using the two-way audio or recording with audio functions, please set the Stream Type to
Video & Audio referring to Section 7.2.1 Configure Video Settings.
Please refer to the following sections for more information:
Configure remote recording in Section 5.1.1 Configure Recording Schedule.
Setting the image quality of the live video in Section 7.3 Configure Image Settings.
and Section 7.2.1 Configure Video Settings.
Setting the OSD text on live video in Section 7.3.2 Configure OSD Settings.
4.4 Operate PTZ Control
Purpose:
In the live view interface, you can use the PTZ control buttons to control panning, tilting and
zooming.
4.4.1 PTZ Control Panel
On the live view page, click to show the PTZ control panel or click to hide it.
Click the direction buttons to control the pan/tilt movements.
Click the zoom/iris/focus buttons to realize lens control.