DS-3E0318P-E/DS-3E0326P-E User Manual UD.
User Manual of Network Video Recorder User Manual COPYRIGHT ©2016 Hangzhou Hikvision Digital Technology Co., Ltd. ALL RIGHTS RESERVED. Any and all information, including, among others, wordings, pictures, graphs are the properties of Hangzhou Hikvision Digital Technology Co., Ltd. or its subsidiaries (hereinafter referred to be “Hikvision”).
User Manual of Network Video Recorder Regulatory Information CE Mark Warning This is a Class A product. In a domestic environment, this product may cause radio interference, in which case the user may be required to take adequate measures. For Pluggable Equipment, the socket-outlet shall be installed near the equipment and shall be easily accessible. WARNING: The mains plug is used as disconnect device, the disconnect device shall remain readily operable.
User Manual of Network Video Recorder Safety Instruction These instructions are intended to ensure that user can use the product correctly to avoid danger or property loss. The precaution measure is divided into “Warnings” and “Cautions” Warnings: Serious injury or death may occur if any of the warnings are neglected. Cautions: Injury or equipment damage may occur if any of the cautions are neglected.
User Manual of Network Video Recorder Preventive and Cautionary Tips Before connecting and operating your device, please be advised of the following tips: • • • • • Ensure unit is installed in a well-ventilated, dust-free environment. Unit is designed for indoor use only. Keep all liquids away from the device. Ensure environmental conditions meet factory specifications. Ensure unit is properly secured to a rack or shelf.
User Manual of Network Video Recorder Thank you for purchasing our product. If there is any question or request, please do not hesitate to contact dealer. The figures in the manual are for reference only. This manual is applicable to the models listed in the following table.
User Manual of Network Video Recorder TABLE OF CONTENTS Chapter 1 Product Overview ............................................................................................................................. 7 1.1 Introduction ................................................................................................................................................ 7 1.2 Package Contents ..............................................................................................................
User Manual of Network Video Recorder Chapter 1 Product Overview 1.1 Introduction DS-3E0318P-E/DS-3E0326P-E is a 16/24-Port 10/100Mbps + 2-Port Gigabit TP/SFP Combo Unmanaged PoE Switch. It provides 16/24 10/100Mbps auto-negotiation RJ45 ports and 2 Gigabit TP/SFP combos. DS-3E0318P-E/DS-3E0326P-E (Ports 1-16/24) supports IEEE 802.3af PoE (15.4W) and IEEE 802.3at PoE+ (30W) powering. The whole PoE output is 230W (DS-3E0318P-E) and 370W (DS-3E0326P-E).
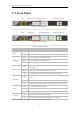
User Manual of Network Video Recorder 1.3 Front Panel Figure 1.1 DS-3E0318P-E Figure 1.2 DS-3E0326P-E Table 1.1 Description of LEDs LED Status Description Solid The device is connected to the power supply properly. PWR Off Solid LINK/ACT Blinking Off Solid POE STATUS Blinking Off Solid POE-MAX Blinking Off Solid G1/G2 Blinking Off Solid The device is connected improperly or not connected to the power supply. The corresponding port is connected properly.
User Manual of Network Video Recorder Extend Mode Details for enabling extend mode: Status Status Description Default Ports 1-8: 100M ON Ports 1-8: 10M with Extend Mode being enabled Default Ports 9-16: 100M ON Ports 9-16: 10M with Extend Mode being enabled EXTEND 17-24 Default Ports 17-24: 100M *Only for DS-3E0326P-E ON Ports 17-24: 10M with Extend Mode being enabled EXTEND 1-8 EXTEND 9-16 Cautions 1.
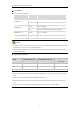
User Manual of Network Video Recorder 1.4 Rear Panel The rear panels of DS-3E0318P-E/ DS-3E0326P-E are similar. Here take DS-3E0326P-E as a guide. Figure 1.2 DS-3E0326P-E Power Socket Used for connecting the included power cord for power supply. Please use the included power cord to connect the device to power supply. Grounding Terminal Used for connecting the grounding cable for lightning-resisting. The grounding details refer to Section 2.
User Manual of Network Video Recorder Chapter 2 Device Installation (Here DS-3E0326P-E is taken as an installation guide, which applies to DS-3E0318P-E.) 2.1 Installation Notes To guarantee the device long service and your personal safety, please follow notes below. Safety Alert Wear antistatic gloves while installing, and connect the device to power after finishing other installation. Use the included power cord to power the device.
User Manual of Network Video Recorder Lightning Protection In a thunderstorm weather, a sudden current may damage the device. To protect the device from lightning stroke or strong current, please: Make sure the device, the installation desktop/rack and power outlet on the wall all are well-grounded. Cable the device properly; and if you need to cable outdoors, it is advisable to set up with a signal lightning arrester.
User Manual of Network Video Recorder 1) Fix the rack on the ground, stable and level; and ground the device well. 2) Fix L-shaped brackets to the device with screws. (Shown as below) Figure 2.2 L-shaped bracket installation 3) Adjust the device to a nice height and fix the device to the rack with screws (self-prepared). (Shown as below) Figure 2.3 Fix to the rack Desktop-mounting Also, you can install the device on a desktop. 1) Place the device bottom up on a stable and flat desktop.
User Manual of Network Video Recorder Figure 2.4 Paste the footpads 3) Then place the device correctly on the desktop. 2.3 Grounding Grounding is not only important for lightning arresting and anti-interference, but for your own personal safety. Please select the proper method to ground your device. With grounding bar If a grounding bar is available at the installation site, follow either of the two installations to ground the device. A.
User Manual of Network Video Recorder B. Connect to another grounded device 1) Connect one end of the grounding cable to the grounding terminal of the grounded device and fix the screw. 2) Connect to the other end of the grounding cable to the grounding terminal of the device and fix the screw. Figure 2.6 Connect to a grounded device Cautions Connect the grounding cable to the earthing system in the equipment room. Do not connect it to a fire main or lightning.
User Manual of Network Video Recorder Figure 2.7 Ground with an angle steel If both ground bar and the conditions for burying the grounding body are not available, an AC-powered Ethernet switch can be grounded using the PE (Protecting Earth) wire of the AC power supply. Figure 2.8 Ground with 3-core AC power cord Cautions Make sure that the PE wire of the AC power supply has been well grounded at the side of the power distribution room or AC power supply transformer.
User Manual of Network Video Recorder Chapter 3 Physical Connection 3.1 Connect to RJ45 Ports Connect the switch to a remote device with Ethernet cable via RJ45 port. G1 and G2 are uplink ports. Ports 1-16/24 support IEEE 802.3af and IEEE 802.3at PoE supply, and the PD can be wireless AP, IP phone or IP camera, etc. By default, PoE features of Ports 1-16/24 are enabled. Figure 3.1 RJ45 port connection Note that: 1. Cat 5e or better Ethernet cable is recommended.
User Manual of Network Video Recorder 3.2 Connect to SFP Combo 1) Insert your optical module into the SFP port (G1-F/G2-F). Figure 3.2 Insert optical module 2) Insert the remote optical fiber to the module correctly. (RX fiber into the port labeled RX on the module; and TX fiber into the TX) Figure 3.
User Manual of Network Video Recorder 3.3 Check the Cabling Once installation is completed, check the cabling of the device as the following: The operating power supply should accord with rated input standard. Ports cablings and grounding cable are correctly connected. If there is outdoor cabling, connect a lightning protector to the cable before you plug the cable into the port. Figure 3.
User Manual of Network Video Recorder Appendix Technical Specifications Item DS-3E0326P-E DS-3E0318P-E 10/100Mbps RJ45 24 16 10/100/1000Mbps RJ45 2 (G1, G2) 2 (G1, G2) 1000Mbps SFP 2 (G1-F, G2-F) 2 (G1-F, G2-F) High priority ports 1-8 1-8 Store-and-forward Supported MAC Table 4k MAC Learning Auto-learning/ Auto-aging Switching Capacity 8.8Gbps PoE standard IEEE 802.3af, IEEE 802.3at Interfaces 4k Performance PoE Powering Mode PoE Power 7.