
User Manual


DS-72xxHUI-Kx, DS-72xxHQI-Kx Digital Video Recorder (DVR) User Manual
34 UM DS-72xxHUI-Kx, DS-72xxHQI-Kx 062817NA
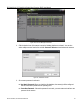
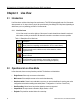
Table 1-7 Explanation of the Icons
4. (Optional) Check the E
nable H.265 checkbox (for initial access) for a connected IP camera that
supports H.265. The IP camera will be encoded with H.265.
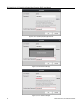
2.6.3 Editing the Connected IP Camera
After adding the IP cameras, the basic information of the camera is listed on the interface, and you can
configure the basic settings.
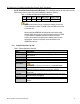
1. Click
to edit the parameters. You can edit the IP address, protocol, and other parameters.
Figure 39, Edit IP Camera
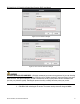
• Channel Port: If the connected device is an encoding device with multiple channels, select the
channel port No. in the drop-down list.
2. Click OK to save the settings and exit from the editing interface.
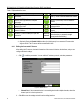
Icon Explanation Icon Explanation
EDIT (Pen): Press to edit basic IP camera
parameters
ADD (+): Press to add the detected IP camera
DISCONNECTED (!): Camera is disconnected;
click the icon to get camera’s exception
information
DELETE (Trash Can): Press to delete the
camera
PLAY (Right Triangle): Play connected
camera’s live video
ADVANCED (Gear): Press to go to advanced
settings window.
UPGRADE (Up Arrow): Upgrade the connected
camera’s firmware
DASH: No advanced settings available for this
camera
REPAIR (?): Press to attempt to repair the
connection
Security
Column
SECURITY: Shows camera status
(active/inactive) or password strength
(strong/medium/weak/risky)