
User Manual
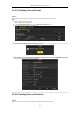
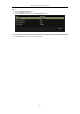

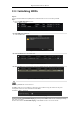
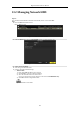
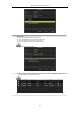

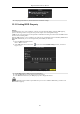
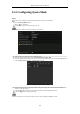
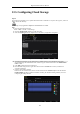
Table Of Contents
- Product Key Features
- Chapter 1 Introduction
- Chapter 2 Getting Started
- Chapter 3 Live View
- Chapter 4 PTZ Controls
- Chapter 5 Recording Settings
- 5.1 Configuring Encoding Parameters
- 5.2 Configuring Recording Schedule
- 5.3 Configuring Motion Detection Recording
- 5.4 Configuring Alarm Triggered Recording
- 5.5 Configuring Event Recording
- 5.6 Configuring Manual Recording
- 5.7 Configuring Holiday Recording
- 5.8 Configuring Redundant Recording
- 5.9 Configuring HDD Group
- 5.10 Files Protection
- 5.11 Configuring 1080P Lite
- Chapter 6 Playback
- 6.1 Playing Back Record Files
- 6.2 Auxiliary Functions of Playback
- Chapter 7 Backup
- Chapter 8 Alarm Settings
- Chapter 9 POS Configuration
- Chapter 10 VCA Alarm
- 10.1 Face Detection
- 10.2 Vehicle Detection
- 10.3 Line Crossing Detection
- 10.4 Intrusion Detection
- 10.5 Region Entrance Detection
- 10.6 Region Exiting Detection
- 10.7 Loitering Detection
- 10.8 People Gathering Detection
- 10.9 Fast Moving Detection
- 10.10 Parking Detection
- 10.11 Unattended Baggage Detection
- 10.12 Object Removal Detection
- 10.13 Audio Exception Detection
- 10.14 Defocus Detection
- 10.15 PIR Alarm
- Chapter 11 VCA Search
- Chapter 12 Network Settings
- Chapter 13 HDD Management
- Chapter 14 Camera Settings
- Chapter 15 DVR Management and Maintenance
- Chapter 16 Others
- Chapter 17 Appendix

Digital Video Recorder User Manual
163
13.1 Initializing HDDs
Purpose:
A newly installed hard disk drive (HDD) must be initialized before it can be used with your DVR.
Steps:
1. Enter the HDD Information interface.
Menu > HDD > General
Figure 13. 1 HDD Information Interface
2. Select HDD to be initialized.
3. Click the Init button.
Figure 13. 2 Confirm Initialization
4. Select the OK button to start initialization.
Figure 13. 3 Start Initialization
5. After the HDD has been initialized, the status of the HDD will change from Uninitialized to Normal.
Figure 13. 4 HDD Status Changes to Normal
Initializing the HDD will erase all data on it.
The HDDs which are free of working for a long time can be enabled to sleep, thus to decrease the power
consumption of the device and extend the life of the HDDs.
Click Menu > HDD > Advanced.
Figure 13. 5 Enable HDD Sleeping
Check the checkbox of Enable HDD Sleeping (by default), and the HDDs which are free of working for a long
time will be set to sleep.
Uncheck the checkbox of Enable HDD Sleeping, and the HDDs will be set to work for all time.