
User Manual
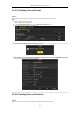
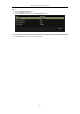

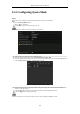
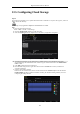
Table Of Contents
- Product Key Features
- Chapter 1 Introduction
- Chapter 2 Getting Started
- Chapter 3 Live View
- Chapter 4 PTZ Controls
- Chapter 5 Recording Settings
- 5.1 Configuring Encoding Parameters
- 5.2 Configuring Recording Schedule
- 5.3 Configuring Motion Detection Recording
- 5.4 Configuring Alarm Triggered Recording
- 5.5 Configuring Event Recording
- 5.6 Configuring Manual Recording
- 5.7 Configuring Holiday Recording
- 5.8 Configuring Redundant Recording
- 5.9 Configuring HDD Group
- 5.10 Files Protection
- 5.11 Configuring 1080P Lite
- Chapter 6 Playback
- 6.1 Playing Back Record Files
- 6.2 Auxiliary Functions of Playback
- Chapter 7 Backup
- Chapter 8 Alarm Settings
- Chapter 9 POS Configuration
- Chapter 10 VCA Alarm
- 10.1 Face Detection
- 10.2 Vehicle Detection
- 10.3 Line Crossing Detection
- 10.4 Intrusion Detection
- 10.5 Region Entrance Detection
- 10.6 Region Exiting Detection
- 10.7 Loitering Detection
- 10.8 People Gathering Detection
- 10.9 Fast Moving Detection
- 10.10 Parking Detection
- 10.11 Unattended Baggage Detection
- 10.12 Object Removal Detection
- 10.13 Audio Exception Detection
- 10.14 Defocus Detection
- 10.15 PIR Alarm
- Chapter 11 VCA Search
- Chapter 12 Network Settings
- Chapter 13 HDD Management
- Chapter 14 Camera Settings
- Chapter 15 DVR Management and Maintenance
- Chapter 16 Others
- Chapter 17 Appendix

Digital Video Recorder User Manual
169
13.5 Configuring Cloud Storage
Purpose
The cloud storage facilitates you to upload and download the recorded files at any time and any place, which can
highly enhance the efficiency.
Cloud storage is only applicable to HQHI-F/N and HUHI-F/N series DVR.
Steps
1. Enter the Cloud Storage interface
Menu > HDD > General > Cloud Storage
2. Check the Enable Cloud checkbox to enable the feature.
3. Select the Cloud Type from the dropdown list to One Drive, Google Drive or Drop Box.
Figure 13. 18 Cloud Storage Interface
4. According to the prompts, you are required to use a mobile browser to scan the QR code to log in the
selected cloud to get the authentication code. And then copy the authentication code to the Authentication
Code text filed.
5. Click Apply and then back to the main menu.
6. Enter the cloud storage interface again about 20s later. When the Status shows online, it indicates the
successful registration.
7. Configure the recording schedule.
Back to enter the record interface, choose a certain camera from the Camera dropdown list and check the
Enable Schedule checkbox to enable the schedule recording. For detailed recording schedule, refer to 5.2
Configuring Recording Schedule.