
User Manual


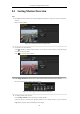
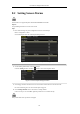
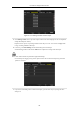
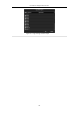
Table Of Contents
- Product Key Features
- Chapter 1 Introduction
- Chapter 2 Getting Started
- Chapter 3 Live View
- Chapter 4 PTZ Controls
- Chapter 5 Recording Settings
- 5.1 Configuring Recording Parameters
- 5.2 Configuring Record Schedule
- 5.3 Configuring Motion Detection Record
- 5.4 Configuring Alarm Triggered Record
- 5.5 Configuring VCA Record
- 5.6 Configuring Manual Record
- 5.7 Configuring Holiday Record
- 5.8 Configuring Redundant Recording
- 5.9 Configuring HDD Group for Recording
- 5.10 Files Protection
- Chapter 6 Playback
- Chapter 7 Backup
- Chapter 8 Alarm Settings
- Chapter 9 Network Settings
- Chapter 10 HDD Management
- Chapter 11 Camera Settings
- Chapter 12 DVR Management and Maintenance
- Chapter 13 Others
- Appendix

User Manual of Digital Video Recorder
125
8.1 Setting Motion Detection
Steps:
1. Enter Motion Detection interface of Camera Management and choose a camera you want to set up motion
detection.
Menu> Camera> Motion
Figure 8. 1 Motion Detection Setup Interface
2. Set detection area and sensitivity.
Check checkbox to enable motion detection, use the mouse to draw detection area(s) and drag the
sensitivity bar to set sensitivity.
Click to set alarm response actions.
Figure 8. 2 Set Detection Area and Sensitivity
3. Click Trigger Channel tab and select one or more channels which will start to record or become
full-screen monitoring when motion alarm is triggered.
Figure 8. 3 Set Trigger Camera of Motion Detection
4. Set arming schedule of the channel.
Select Arming Schedule tab to set the channel’s arming schedule.
Choose one day of a week and up to eight time periods can be set within each day. Or you can click the
Copy button to copy the time period settings to other day(s).