
User Manual
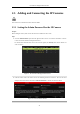
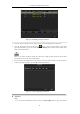
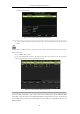
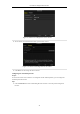
Table Of Contents
- Product Key Features
- Chapter 1 Introduction
- Chapter 2 Getting Started
- Chapter 3 Live View
- Chapter 4 PTZ Controls
- Chapter 5 Recording Settings
- 5.1 Configuring Recording Parameters
- 5.2 Configuring Record Schedule
- 5.3 Configuring Motion Detection Record
- 5.4 Configuring Alarm Triggered Record
- 5.5 Configuring VCA Record
- 5.6 Configuring Manual Record
- 5.7 Configuring Holiday Record
- 5.8 Configuring Redundant Recording
- 5.9 Configuring HDD Group for Recording
- 5.10 Files Protection
- Chapter 6 Playback
- Chapter 7 Backup
- Chapter 8 Alarm Settings
- Chapter 9 Network Settings
- Chapter 10 HDD Management
- Chapter 11 Camera Settings
- Chapter 12 DVR Management and Maintenance
- Chapter 13 Others
- Appendix

User Manual of Digital Video Recorder
45
Figure 2. 18 Adding IP Camera Interface
2. The online cameras with same network segment will be detected and displayed in the camera list.
3. Select the IP camera from the list and click the button to add the camera (with the same admin
password of the DVR’s). Or you can click the One-touch Adding button to add all cameras (with the same
admin password) from the list.
Make sure the camera to add has already been actiavted by setting the admin password, and the admin
password of the camera is the same with the DVR’s.
4. (For the encoders with multiple channels only) check the checkbox of Channel Port in the pop-up window,
as shown in the following figure, and click OK to add multiple channels.
Figure 2. 19 Selecting Multiple Channels
OPTION 2:
Steps:
1) On the IP Camera Management interface, click the Custom Adding button to pop up the Add IP