
Operation Manual


User Manual of Digital Video Recorder
145
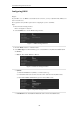
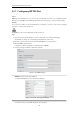
Figure 9. 15 Configure SNMP Settings
5. Click the Apply button to save and exit the interface.
Before setting the SNMP, please download the SNMP software and manage to receive the device information
via SNMP port. By setting the Trap Address, the DVR is allowed to send the alarm event and exception
message to the surveillance center.
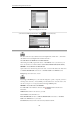
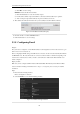
9.2.5 Configuring NAT
Purpose:
Universal Plug and Play (UPnP™) can permit the device seamlessly discover the presence of other network
devices on the network and establish functional network services for data sharing, communications, etc. You can
use the UPnP™ function to enable the fast connection of the device to the WAN via a router without port
mapping.
Before you start:
If you want to enable the UPnP™ function of the device, you must enable the UPnP™ function of the router to
which your device is connected. When the network working mode of the device is set as multi-address, the
Default Route of the device should be in the same network segment as that of the LAN IP address of the router.
Steps:
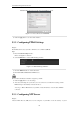
1. Enter the Network Settings interface.
Menu > Configuration > Network
2. Select the NAT tab to enter the UPnP™ settings interface.
Figure 9. 16 UPnP™ Settings Interface
3. Check checkbox to enable UPnP™.
4. Select the Mapping Type as Manual or Auto in the drop-down list.
OPTION 1: Auto
If you select Auto, the Port Mapping items are read-only, and the external ports are set by the router
automatically.