DS-76xxNI-QxxP Network Video Recorder Quick Start Guide
DS-76xxNI-QxxP NVR Quick Start Guide TABLE OF CONTENTS Chapter1 Panels Description ............................................................................................................... 5 2.1 Front Panel .............................................................................................................................................. 5 DS-7600NI-Q1 (/P) Series ......................................................................................................................
DS-76xxNI-QxxP NVR Quick Start Guide COPYRIGHT © 2017-2018 Hangzhou Hikvision Digital Technology Co., Ltd. ALL RIGHTS RESERVED. Any and all information, including, among others, wordings, pictures, graphs are the properties of Hangzhou Hikvision Digital Technology Co., Ltd., or its subsidiaries (hereinafter referred to be “Hikvision”).
DS-76xxNI-QxxP NVR Quick Start Guide FCC Conditions This device complies with part 15 of the FCC Rules. Operation is subject to the following two conditions: 1. This device may not cause harmful interference. 2. This device must accept any interference received, including interference that may cause undesired operation.
DS-76xxNI-QxxP NVR Quick Start Guide Safety Instructions • Proper configuration of all passwords and other security settings is the responsibility of the installer and/or end-user. • In the use of the product, you must be in strict compliance with the electrical safety regulations of the nation and region. Please refer to technical specifications for detailed information.
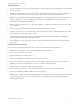
DS-76xxNI-QxxP NVR Quick Start Guide Chapter1 Panels Description 2.1 Front Panel DS-7600NI-Q1 (/P) Series Figure 1, DS-7600NI-Q1 and DS-7600NI-Q1/P Series Table 1-1 Panel Description No. 1 2 Name Status Indicator Description Power indicator turns green when system is running. Status indicator blinks red when data is being read from or written to HDD. Tx/Rx indictor blinks green when network connection is functioning properly.
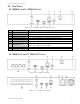
DS-76xxNI-QxxP NVR Quick Start Guide 2.2 Rear Panel DS-7600NI-Q1 and DS-7600NI-Q2 Series Figure 3, DS-7600NI-Q1 and DS-7600NI-Q2 Series No. 1 2 3 4 5 6 Item Power Supply Audio In HDMI Interface LAN Network Interface Audio Out VGA Interface 7 USB Interface 8 9 Ground Power Switch Description 12 VDC power supply RCA connector for audio input HDMI video output connector 1, 10/100/1000 Mbps self-adaptive Ethernet interface RCA connector for audio output. DB9 connector for VGA output.
DS-76xxNI-QxxP NVR Quick Start Guide No. 1 2 3 4 5 6 Item Power Supply Audio In HDMI Interface LAN Network Interface Audio Out VGA Interface 7 USB Interface 8 9 Ground Power Switch Network Interfaces with PoE function 10 Description 100~240 VAC power supply RCA connector for audio input HDMI video output connector 1, 10 /100 /1000 Mbps self-adaptive Ethernet interface RCA connector for audio output DB9 connector for VGA output. Display local video output and menu.
DS-76xxNI-QxxP NVR Quick Start Guide Figure 6, Remove Cover Step 2 Connect one end of the data cable to the motherboard of NVR and the other end to the HDD. Figure 7, Connect Data Cable Figure 8, Connect Power Cable Step 3 Connect the power cable to the HDD. Step 4 Place the HDD on the bottom of the device and then fasten the screws on the bottom to fix the HDD.
DS-76xxNI-QxxP NVR Quick Start Guide Figure 9, Fix Hard Disk 2.3 HDD Storage Calculation Chart The following chart shows an estimation of storage space used based on recording at one channel for an hour at a fixed bit rate. Bit Rate 96K 128K 160K 192K 224K 256K 320K 384K 448K 512K 640K 768K 896K 1024K 1280K 1536K 1792K 2048K 4096K 8192K 16384K Storage Used 42M 56M 70M 84M 98M 112M 140M 168M 196M 225M 281M 337M 393M 450M 562M 675M 787M 900M 1.8G 3.6G 7.
DS-76xxNI-QxxP NVR Quick Start Guide Chapter 3 Menu Operation 3.1 Menu Structure Refer to the following figure for the menu structure: Figure 10, Menu Structure The menu structure may vary by model. 3.2 Startup and Shutdown Proper startup and shutdown procedures are crucial to expanding the life of the NVR. To start your NVR: Step 1 Check the power supply is plugged into an electrical outlet. It is HIGHLY recommended that an Uninterruptible Power Supply (UPS) be used in conjunction with the device.
DS-76xxNI-QxxP NVR Quick Start Guide 3.3 Activating Your Device Purpose: For the first-time access, you need to activate the device by setting an admin password. No operation is allowed before activation. You can also activate the device via Web browser, SADP, or client software. Step 1 Input the same password in the text field of Create New Password and Confirm New Password.
DS-76xxNI-QxxP NVR Quick Start Guide Figure 13, Warning of Weak Password 3.4 Using the Unlock Pattern for Login For the Admin user, you can configure the unlock pattern for device login. After the device is activated, enter the following interface to configure the device unlock pattern. Step 1 Use the mouse to draw a pattern among the nine dots on the screen. Release the mouse when the pattern is done. Figure 14, Draw the Pattern • Connect at least four dots to draw the pattern.
DS-76xxNI-QxxP NVR Quick Start Guide Figure 15, Draw the Unlock Pattern 3.5 User Login Purpose: If NVR has logged out, you must login the device before operating the menu and other functions. Step 1 Select the User Name in the drop-down list. Figure 16, Login Step 2 Input password. Step 3 Click OK to log in. In the Login dialog box, if you enter the wrong password seven times, the current user account will be locked for 60 seconds.
DS-76xxNI-QxxP NVR Quick Start Guide 3.6 Using the Setup Wizard The Setup Wizard can walk you through some important settings of the device. By default, the Setup Wizard starts once the device has loaded. Check the checkbox to enable Setup Wizard when device starts. Click Next to continue the setup wizard. Follow the guide of the Setup Wizard to configure the system resolution, system date/time, network settings, HDD management, record settings, etc. Figure 17, Wizard 3.
DS-76xxNI-QxxP NVR Quick Start Guide Figure 18, Network Settings Step 2 Select the General tab. Step 3 In the General Settings interface, you can configure the following settings: NIC Type, IPv4 Address, IPv4 Gateway, MTU, and DNS Server. Step 4 If the DHCP server is available, you can check the DHCP checkbox to automatically obtain an IP address and other network settings from that server. Step 5 After having configured the general settings, click the Apply button to save the settings. 3.
DS-76xxNI-QxxP NVR Quick Start Guide Figure 19, Add IP Camera • Select the detected IP camera and click the Add button to add it directly. You can click the Search button to refresh the online IP camera manually, or you can choose to custom add the IP camera by editing the parameters in the corresponding text field and then click the Add button to add it. 3.9 Live View Icons are provided on screen in Live View mode to indicate camera status.
DS-76xxNI-QxxP NVR Quick Start Guide After rebooting, all the manual records enabled are canceled. Step 1 On the live view window, right click the window and move the cursor to the Start Recording option, and select Continuous Record or Motion Detection Record. Figure 20, Start Recording from Right-Click Menu Step 2 Click the Yes button in the pop-up Attention message box to confirm the settings. All the channels will start to record in the selected mode. 3.
Chapter 4 Accessing by Web Browser You shall acknowledge that the use of the product with Internet access might be under network security risks. For avoidance of any network attacks and information leakage, strengthen your own protection. If the product does not work properly, contact your dealer or the nearest service center. Purpose: You can access the device via Web browser. You may use one of the following listed Web browsers: Internet Explorer 6.0, Internet Explorer 7.0, Internet Explorer 8.
password monthly or weekly can better protect your product. • If the device is already activated, enter the user name and password in the login interface and click the Login button. Figure 23, Login Step 3 Install the plug-in before viewing the live video and managing the camera. Follow the installation prompts to install the plug-in. You may have to close the Web browser to finish the plug-in installation.