
User Manual
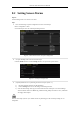
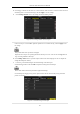

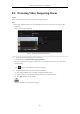
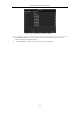
Table Of Contents
- Product Key Features
- Chapter 1 Introduction
- Chapter 2 Getting Started
- Chapter 3 Live View
- Chapter 4 PTZ Controls
- Chapter 5 Recording Settings
- 5.1 Configuring Parameters
- 5.2 Configuring Recording Schedule
- 5.3 Configuring Motion Detection Recording
- 5.4 Configuring Alarm Triggered Recording
- 5.5 Configuring VCA Event Recording
- 5.6 Manual Recording
- 5.7 Configuring Holiday Recording
- 5.8 Configuring Redundant Recording
- 5.9 Configuring HDD Group for Recording
- 5.10 Files Protection
- Chapter 6 Playback
- 6.1 Playing Back Record Files
- 6.2 Auxiliary Functions of Playback
- Chapter 7 Backup
- Chapter 8 Alarm Settings
- Chapter 9 VCA Alarm
- 9.1 Face Detection
- 9.2 Vehicle Detection
- 9.3 Line Crossing Detection
- 9.4 Intrusion Detection
- 9.5 Region Entrance Detection
- 9.6 Region Exiting Detection
- 9.7 Unattended Baggage Detection
- 9.8 Object Removal Detection
- 9.9 Audio Exception Detection
- 9.10 Sudden Scene Change Detection
- 9.11 Defocus Detection
- 9.12 PIR Alarm
- Chapter 10 VCA Search
- Chapter 11 Network Settings
- Chapter 12 HDD Management
- Chapter 13 Camera Settings
- Chapter 14 NVR Management and Maintenance
- Chapter 15 Others
- Chapter 16 Appendix

Network Video Recorder User Manual
128
8.6 Setting Alarm Response Actions
Purpose:
Alarm response actions will be activated when an alarm or exception occurs, including Event Hint Display, Full
Screen Monitoring, Audible Warning (buzzer), Notify Surveillance Center, Upload Picture to FTP, Trigger Alarm
Output and Send Email.
Event Hint Display
When an event or exception happens, a hint can be displayed on the lower-left corner of live view image. And you
can click the hint icon to check the details. Besides, the event to be displayed is configurable.
Steps:
1. Enter the Exception settings interface.
Menu > Configuration > Exceptions
2. Check the checkbox of Enable Event Hint.
Figure 8. 14 Event Hint Settings Interface
3. Click the to set the type of event to be displayed on the image.
Figure 8. 15 Event Hint Settings Interface
4. Click the OK button to finish settings.
Full Screen Monitoring
When an alarm is triggered, the local monitor (VGA and HDMI
TM
monitor) display in full screen the video image
from the alarming channel configured for full screen monitoring.
If alarms are triggered simultaneously in several channels, their full-screen images will be switched at an interval
of 10 seconds (default dwell time). A different dwell time can be set by going to Menu >Configuration>Live
View > Full Screen Monitoring Dwell Time.
Auto-switch will terminate once the alarm stops and you will be taken back to the Live View interface.