
User Manual
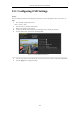
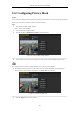


Table Of Contents
- Product Key Features
- Chapter 1 Introduction
- Chapter 2 Getting Started
- Chapter 3 Live View
- Chapter 4 PTZ Controls
- Chapter 5 Recording Settings
- 5.1 Configuring Parameters
- 5.2 Configuring Recording Schedule
- 5.3 Configuring Motion Detection Recording
- 5.4 Configuring Alarm Triggered Recording
- 5.5 Configuring VCA Event Recording
- 5.6 Manual Recording
- 5.7 Configuring Holiday Recording
- 5.8 Configuring Redundant Recording
- 5.9 Configuring HDD Group for Recording
- 5.10 Files Protection
- Chapter 6 Playback
- 6.1 Playing Back Record Files
- 6.2 Auxiliary Functions of Playback
- Chapter 7 Backup
- Chapter 8 Alarm Settings
- Chapter 9 VCA Alarm
- 9.1 Face Detection
- 9.2 Vehicle Detection
- 9.3 Line Crossing Detection
- 9.4 Intrusion Detection
- 9.5 Region Entrance Detection
- 9.6 Region Exiting Detection
- 9.7 Unattended Baggage Detection
- 9.8 Object Removal Detection
- 9.9 Audio Exception Detection
- 9.10 Sudden Scene Change Detection
- 9.11 Defocus Detection
- 9.12 PIR Alarm
- Chapter 10 VCA Search
- Chapter 11 Network Settings
- Chapter 12 HDD Management
- Chapter 13 Camera Settings
- Chapter 14 NVR Management and Maintenance
- Chapter 15 Others
- Chapter 16 Appendix

Network Video Recorder User Manual
191
13.2 Configuring Privacy Mask
Purpose:
You are allowed to configure the four-sided privacy mask zones that cannot be viewed by the operator. The privacy
mask can prevent certain surveillance areas to be viewed or recorded.
Steps:
1. Enter the Privacy Mask Settings interface.
Menu > Camera >Privacy Mask
2. Select the camera to set privacy mask.
3. Click the checkbox of Enable Privacy Mask to enable this feature.
Figure 13. 2 Privacy Mask Settings Interface
4. Use the mouse to draw a zone on the window. The zones will be marked with different frame colors.
Up to 4 privacy masks zones can be configured and the size of each area can be adjusted.
5. The configured privacy mask zones on the window can be cleared by clicking the corresponding Clear
Zone1-4 icons on the right side of the window, or click Clear All to clear all zones.
Figure 13. 3 Set Privacy Mask Area
6. Click the Apply button to save the settings.