
User Manual
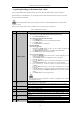

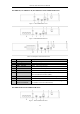
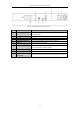
Table Of Contents
- Product Key Features
- Chapter 1 Introduction
- Chapter 2 Getting Started
- Chapter 3 Live View
- Chapter 4 PTZ Controls
- Chapter 5 Recording Settings
- 5.1 Configuring Parameters
- 5.2 Configuring Recording Schedule
- 5.3 Configuring Motion Detection Recording
- 5.4 Configuring Alarm Triggered Recording
- 5.5 Configuring VCA Event Recording
- 5.6 Manual Recording
- 5.7 Configuring Holiday Recording
- 5.8 Configuring Redundant Recording
- 5.9 Configuring HDD Group for Recording
- 5.10 Files Protection
- Chapter 6 Playback
- 6.1 Playing Back Record Files
- 6.2 Auxiliary Functions of Playback
- Chapter 7 Backup
- Chapter 8 Alarm Settings
- Chapter 9 VCA Alarm
- 9.1 Face Detection
- 9.2 Vehicle Detection
- 9.3 Line Crossing Detection
- 9.4 Intrusion Detection
- 9.5 Region Entrance Detection
- 9.6 Region Exiting Detection
- 9.7 Unattended Baggage Detection
- 9.8 Object Removal Detection
- 9.9 Audio Exception Detection
- 9.10 Sudden Scene Change Detection
- 9.11 Defocus Detection
- 9.12 PIR Alarm
- Chapter 10 VCA Search
- Chapter 11 Network Settings
- Chapter 12 HDD Management
- Chapter 13 Camera Settings
- Chapter 14 NVR Management and Maintenance
- Chapter 15 Others
- Chapter 16 Appendix

Network Video Recorder User Manual
20
- Unpairing (Disabling) an IR Remote from a DVR
To unpair an IR Remote from a DVR so that the unit cannot control any DVR functions, proceed as follows:
Press the DEV key on the IR Remote. Any existing Device ID# will be erased from the unit’s memory and it will
no longer function with the DVR.
(Re)-enabling the IR Remote requires pairing to a DVR. See “Pairing the IR Remote to a Specific DVR
(optional),” above.
The keys on the remote control closely resemble the ones on the front panel. See Table1.4..
Table 1. 4 IR Remote Functions
No.
Name
Function Description
1
POWER ON/OFF
• To Turn Power On:
- If User Has Not Changed the Default DVR Device ID# (255):
1. Press Power On/Off button (1).
- If User Has Changed the DVR Device ID#:
1. Press DEV button.
2. Press Number buttons to enter user-defined Device ID#.
3. Press Enter button.
4. Press Power button to start device.
• To Turn DVR Off:
- If User Is Logged On:
1. Hold Power On/Off button (1) down for five seconds to display the
“Yes/No” verification prompt.
2. Use Up/Down Arrow buttons (12) to highlight desired selection.
3. Press Enter button (12) to accept selection.
- If User Is Not Logged On:
1. Hold Power On/Off button (1) down for five seconds to display the user
name/password prompt.
2. Press the Enter button (12) to display the on-screen keyboard.
3. Input the user name.
4. Press the Enter button (12) to accept input and dismiss the on-screen
keyboard.
5. Use the Down Arrow button (12) to move to the “Password” field.
6. Input password (use on-screen keyboard or numeric buttons (3) for
numbers).
7. Press the Enter button (12) to accept input and dismiss the on-screen
keyboard.
8. Press the OK button on the screen to accept input and display the Yes/No”
verification prompt (use Up/Down Arrow buttons (12) to move between
fields)
9. Press Enter button (12) to accept selection.
User name/password prompt depends on DVR is configuration. See “System
Configuration” section.
2
DEV
Enable IR Remote: Press DEV button, enter DVR Device ID# with number keys,
press Enter to pair unit with the DVR
Disable IR Remote: Press DEV button to clear Device ID#; unit will no longer
be paired with the DVR
3
Numerals
Switch to the corresponding channel in Live View or PTZ Control mode
Input numbers in Edit mode
4
EDIT
Delete characters before cursor
Check the checkbox and select the ON/OFF switch
5
A
Adjust focus in the PTZ Control menu
Switch on-screen keyboards (upper and lower case alphabet, symbols, and
numerals)
6
REC
Enter Manual Record setting menu
Call a PTZ preset by using the numeric buttons in PTZ control settings
Turn audio on/off in Playback mode
7
PLAY
Go to Playback mode
Auto scan in the PTZ Control menu