
User Manual
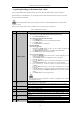

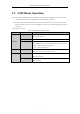
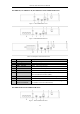
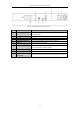
Table Of Contents
- Product Key Features
- Chapter 1 Introduction
- Chapter 2 Getting Started
- Chapter 3 Live View
- Chapter 4 PTZ Controls
- Chapter 5 Recording Settings
- 5.1 Configuring Parameters
- 5.2 Configuring Recording Schedule
- 5.3 Configuring Motion Detection Recording
- 5.4 Configuring Alarm Triggered Recording
- 5.5 Configuring VCA Event Recording
- 5.6 Manual Recording
- 5.7 Configuring Holiday Recording
- 5.8 Configuring Redundant Recording
- 5.9 Configuring HDD Group for Recording
- 5.10 Files Protection
- Chapter 6 Playback
- 6.1 Playing Back Record Files
- 6.2 Auxiliary Functions of Playback
- Chapter 7 Backup
- Chapter 8 Alarm Settings
- Chapter 9 VCA Alarm
- 9.1 Face Detection
- 9.2 Vehicle Detection
- 9.3 Line Crossing Detection
- 9.4 Intrusion Detection
- 9.5 Region Entrance Detection
- 9.6 Region Exiting Detection
- 9.7 Unattended Baggage Detection
- 9.8 Object Removal Detection
- 9.9 Audio Exception Detection
- 9.10 Sudden Scene Change Detection
- 9.11 Defocus Detection
- 9.12 PIR Alarm
- Chapter 10 VCA Search
- Chapter 11 Network Settings
- Chapter 12 HDD Management
- Chapter 13 Camera Settings
- Chapter 14 NVR Management and Maintenance
- Chapter 15 Others
- Chapter 16 Appendix

Network Video Recorder User Manual
21
8
INFO
Reserved
9
VOIP
Switches between main and spot output
Zooms out the image in PTZ control mode
10
MENU
Return to Main menu (after successful login)
N/A
Show/hide full screen in Playback mode
12
DIRECTION
Navigate between fields and menu items
Use Up/Down buttons to speed up/slow down recorded video, and Left/Right
buttons to advance/rewind 30 secs in Playback mode
Cycle through channels in Live View mode
Control PTZ camera movement in PTZ control mode
ENTER
Confirm selection in any menu mode
Checks checkbox
Play or pause video in Playback mode
Advance video a single frame in single-frame Playback mode
Stop/start auto switch in auto-switch mode
13
PTZ
Enter PTZ Control mode
14
ESC
Go back to previous screen
N/A
15
RESERVED
Reserved
16
F1
Select all items on a list
N/A
Switch between play and reverse play in Playback mode
17
PTZ Control
Adjust PTZ camera iris, focus, and zoom
18
F2
Cycle through tab pages
Switch between channels in Synchronous Playback mode
Troubleshooting Remote Control:
Make sure you have installed batteries properly in the remote control. And you have to aim the remote control at
the IR receiver in the front panel.
If there is no response after you press any button on the remote, follow the procedure below to troubleshoot.
Steps:
1. Go to Menu > Settings > General > More Settings by operating the front control panel or the mouse.
2. Check and remember NVR ID#. The default ID# is 255. This ID# is valid for all the IR remote controls.
3. Press the DEV button on the remote control.
4. Enter the NVR ID# you set in step 2.
5. Press the ENTER button on the remote.
If the Status indicator on the front panel turns blue, the remote control is operating properly. If the Status indicator
does not turn blue and there is still no response from the remote, please check the following:
1. Batteries are installed correctly and the polarities of the batteries are not reversed.
2. Batteries are fresh and not out of charge.
3. IR receiver is not obstructed.
4. No fluorescent lamp is used nearby
If the remote still can’t function properly, please change a remote and try again, or contact the device provider.