
User Manual

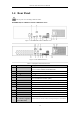
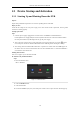
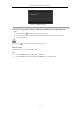
Table Of Contents
- Product Key Features
- Chapter 1 Introduction
- Chapter 2 Getting Started
- Chapter 3 Live View
- Chapter 4 PTZ Controls
- Chapter 5 Recording Settings
- 5.1 Configuring Parameters
- 5.2 Configuring Recording Schedule
- 5.3 Configuring Motion Detection Recording
- 5.4 Configuring Alarm Triggered Recording
- 5.5 Configuring VCA Event Recording
- 5.6 Manual Recording
- 5.7 Configuring Holiday Recording
- 5.8 Configuring Redundant Recording
- 5.9 Configuring HDD Group for Recording
- 5.10 Files Protection
- Chapter 6 Playback
- 6.1 Playing Back Record Files
- 6.2 Auxiliary Functions of Playback
- Chapter 7 Backup
- Chapter 8 Alarm Settings
- Chapter 9 VCA Alarm
- 9.1 Face Detection
- 9.2 Vehicle Detection
- 9.3 Line Crossing Detection
- 9.4 Intrusion Detection
- 9.5 Region Entrance Detection
- 9.6 Region Exiting Detection
- 9.7 Unattended Baggage Detection
- 9.8 Object Removal Detection
- 9.9 Audio Exception Detection
- 9.10 Sudden Scene Change Detection
- 9.11 Defocus Detection
- 9.12 PIR Alarm
- Chapter 10 VCA Search
- Chapter 11 Network Settings
- Chapter 12 HDD Management
- Chapter 13 Camera Settings
- Chapter 14 NVR Management and Maintenance
- Chapter 15 Others
- Chapter 16 Appendix

Network Video Recorder User Manual
28
2.1 Device Startup and Activation
2.1.1 Starting Up and Shutting Down the NVR
Purpose:
Proper startup and shutdown procedures are crucial to expanding the life of the NVR.
Before you start:
Check that the voltage of the extra power supply is the same with the NVR’s requirement, and the ground
connection is working properly.
Starting up the NVR:
Steps:
1. Check the power supply is plugged into an electrical outlet. It is HIGHLY recommended that an
Uninterruptible Power Supply (UPS) be used in conjunction with the device. The Power indicator LED on
the front panel should be red, indicating the device gets the power supply.
2. Turn on the power switch on the rear panel if the device starts up for the first time, or press the button
on the front panel. The Power indicator LED should turn blue indicating that the unit begins to start up.
3. After startup, the Power indicator LED remains blue. A splash screen with the status of the HDD appears on
the monitor. The row of icons at the bottom of the screen shows the HDD status. ‘X’ means that the HDD is
not installed or cannot be detected.
Shutting down the NVR
There are two proper ways to shut down the NVR.
OPTION 1: By Standard shutdown
Steps:
1. Enter the Shutdown menu.
Menu > Shutdown
Figure 2. 1 Shutdown Menu
2. Click the Shutdown button.
3. Click the Yes button.
4. For the DS-7600NI-E1 (E2) series, turn off the power switch on the rear panel when the attention pops up.