
User Manual
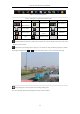

Table Of Contents
- Product Key Features
- Chapter 1 Introduction
- Chapter 2 Getting Started
- Chapter 3 Live View
- Chapter 4 PTZ Controls
- Chapter 5 Recording Settings
- 5.1 Configuring Parameters
- 5.2 Configuring Recording Schedule
- 5.3 Configuring Motion Detection Recording
- 5.4 Configuring Alarm Triggered Recording
- 5.5 Configuring VCA Event Recording
- 5.6 Manual Recording
- 5.7 Configuring Holiday Recording
- 5.8 Configuring Redundant Recording
- 5.9 Configuring HDD Group for Recording
- 5.10 Files Protection
- Chapter 6 Playback
- 6.1 Playing Back Record Files
- 6.2 Auxiliary Functions of Playback
- Chapter 7 Backup
- Chapter 8 Alarm Settings
- Chapter 9 VCA Alarm
- 9.1 Face Detection
- 9.2 Vehicle Detection
- 9.3 Line Crossing Detection
- 9.4 Intrusion Detection
- 9.5 Region Entrance Detection
- 9.6 Region Exiting Detection
- 9.7 Unattended Baggage Detection
- 9.8 Object Removal Detection
- 9.9 Audio Exception Detection
- 9.10 Sudden Scene Change Detection
- 9.11 Defocus Detection
- 9.12 PIR Alarm
- Chapter 10 VCA Search
- Chapter 11 Network Settings
- Chapter 12 HDD Management
- Chapter 13 Camera Settings
- Chapter 14 NVR Management and Maintenance
- Chapter 15 Others
- Chapter 16 Appendix

Network Video Recorder User Manual
53
3.2 Operations in Live View Mode
In live view mode, there are many functions provided. The functions are listed below.
• Single Screen: showing only one screen on the monitor.
• Multi-screen: showing multiple screens on the monitor simultaneously.
• Auto-switch: the screen is auto switched to the next one. And you must set the dwell time for each screen on
the configuration menu before enabling the auto-switch.
Menu > Configuration > Live View > Dwell Time.
• Start Recording: continuous record and motion detection record are supported.
• Output Mode: select the output mode to Standard, Bright, Gentle or Vivid.
• Add IP Camera: the shortcut to the IP camera management interface.
• Playback: playback the recorded videos for current day.
• Aux Monitor: the NVR checks the connection of the output interfaces to define the main and auxiliary
output interfaces. The priority level for the main and aux output is HDMI > VGA
When both the HDMI and VGA are connected, the HDMI is used as main output and the VGA is used as the
aux output.
When the aux output is enabled, the main output cannot perform any operation, and you can do some basic
operation on the live view mode for the Aux output.
3.2.1 Front Panel Operation on Live View
The front panel operation is supported by DS-8600NI-E8 and DS-7700NI-E4(/P) models only.
Table 3. 2 Front Panel Operation in Live View
Functions
Front Panel Operation
Show single screen
Press the corresponding Alphanumeric button. E.g. Press 2 to display only the
screen for channel 2.
Show multi-screen
Press the PREV/FOCUS- button.
Manually switch screens
Next screen: right/down direction button.
Previous screen: left/up direction button.
Auto-switch
Press Enter button.
Playback
Press Play button.
3.2.2 Using the Mouse in Live View
Table 3. 3 Mouse Operation in Live View
Name
Description
Common Menu
Quick access to the sub-menus which you frequently visit.
Menu
Enter the main menu of the system by right clicking the mouse.