
User Manual
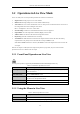
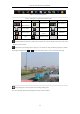
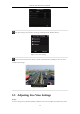
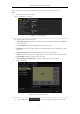

Table Of Contents
- Product Key Features
- Chapter 1 Introduction
- Chapter 2 Getting Started
- Chapter 3 Live View
- Chapter 4 PTZ Controls
- Chapter 5 Recording Settings
- 5.1 Configuring Parameters
- 5.2 Configuring Recording Schedule
- 5.3 Configuring Motion Detection Recording
- 5.4 Configuring Alarm Triggered Recording
- 5.5 Configuring VCA Event Recording
- 5.6 Manual Recording
- 5.7 Configuring Holiday Recording
- 5.8 Configuring Redundant Recording
- 5.9 Configuring HDD Group for Recording
- 5.10 Files Protection
- Chapter 6 Playback
- 6.1 Playing Back Record Files
- 6.2 Auxiliary Functions of Playback
- Chapter 7 Backup
- Chapter 8 Alarm Settings
- Chapter 9 VCA Alarm
- 9.1 Face Detection
- 9.2 Vehicle Detection
- 9.3 Line Crossing Detection
- 9.4 Intrusion Detection
- 9.5 Region Entrance Detection
- 9.6 Region Exiting Detection
- 9.7 Unattended Baggage Detection
- 9.8 Object Removal Detection
- 9.9 Audio Exception Detection
- 9.10 Sudden Scene Change Detection
- 9.11 Defocus Detection
- 9.12 PIR Alarm
- Chapter 10 VCA Search
- Chapter 11 Network Settings
- Chapter 12 HDD Management
- Chapter 13 Camera Settings
- Chapter 14 NVR Management and Maintenance
- Chapter 15 Others
- Chapter 16 Appendix

Network Video Recorder User Manual
58
2) Select the small window, and double-click on the channel number to display the channel on the
window.
If you do not want the camera to be displayed on the live view interface, click the corresponding
to stop it.
You can also click button to start live view for all the channels and click to stop all the live
view.
3) Click the Apply button to save the setting.
3. Set the stream type for live view of camera.
1) Click the More Settings to enter the more settings interface.
2) Select the camera to configure from the list.
3) Select the stream type to Main Stream, Sub-Stream or Auto.
Figure 3. 9 Stream Type Settings
4) Click Apply to save the settings.
5) (Optional) You can click the Copy button to copy the stream type settings of the current camera to
other camera (s).
3.4 Channel-zero Encoding
Purpose:
Sometimes you need to get a remote view of many channels in real time from web browser or CMS (Client
Management System) software, in order to decrease the bandwidth requirement without affecting the image quality,
channel-zero encoding is supported as an option for you.
Steps:
1. Enter the Live View Settings interface.
Menu > Configuration > Live View
2. Select the Channel-Zero Encoding tab.
Figure 3. 10 Live View- Channel-Zero Encoding
3. Check the checkbox after Enable Channel Zero Encoding.
4. Configure the Frame Rate, Max. Bitrate Mode and Max. Bitrate.
After you set the Channel-Zero encoding, you can get a view in the remote client or web browser of 16 channels in
one screen.