
User Manual
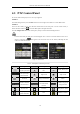

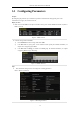
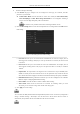
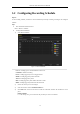
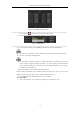
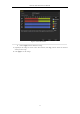
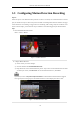
Table Of Contents
- Product Key Features
- Chapter 1 Introduction
- Chapter 2 Getting Started
- Chapter 3 Live View
- Chapter 4 PTZ Controls
- Chapter 5 Recording Settings
- 5.1 Configuring Parameters
- 5.2 Configuring Recording Schedule
- 5.3 Configuring Motion Detection Recording
- 5.4 Configuring Alarm Triggered Recording
- 5.5 Configuring VCA Event Recording
- 5.6 Manual Recording
- 5.7 Configuring Holiday Recording
- 5.8 Configuring Redundant Recording
- 5.9 Configuring HDD Group for Recording
- 5.10 Files Protection
- Chapter 6 Playback
- 6.1 Playing Back Record Files
- 6.2 Auxiliary Functions of Playback
- Chapter 7 Backup
- Chapter 8 Alarm Settings
- Chapter 9 VCA Alarm
- 9.1 Face Detection
- 9.2 Vehicle Detection
- 9.3 Line Crossing Detection
- 9.4 Intrusion Detection
- 9.5 Region Entrance Detection
- 9.6 Region Exiting Detection
- 9.7 Unattended Baggage Detection
- 9.8 Object Removal Detection
- 9.9 Audio Exception Detection
- 9.10 Sudden Scene Change Detection
- 9.11 Defocus Detection
- 9.12 PIR Alarm
- Chapter 10 VCA Search
- Chapter 11 Network Settings
- Chapter 12 HDD Management
- Chapter 13 Camera Settings
- Chapter 14 NVR Management and Maintenance
- Chapter 15 Others
- Chapter 16 Appendix

Network Video Recorder User Manual
73
2. Parameters Setting for Recording
1) Select Record tab page to configure. You can configure the stream type, the resolution, and other
parameters on your demand.
Enable H.264+ Mode: check the checkbox to enable. Once enabled, the Max. Bitrate Mode,
Max. Bitrate(Kbps) and Max. Bitrate Range Recommend are not configurable. Enabling it
helps to ensure the high video quality with a lowered bitrate.
The function is only available for IP cameras which support H.264+ stream.
2) Click the More Settings button to set the advanced parameters for recording and then click OK button to
finish editing.
Figure 5. 4 Recording Parameters-More Settings
• Pre-record: The time you set to record before the scheduled time or event. For example, when an
alarm triggers the recording at 10:00, if you set the pre-record time as 5 seconds, the camera records
it at 9:59:55.
• Post-record: The time you set to record after the event or the scheduled time. For example, when an
alarm triggered recording ends at 11:00, if you set the post-record time as 5 seconds, it records till
11:00:05.
• Expired Time: The expired time is the longest time for a record file to be kept in the HDD, if the
deadline is reached, the file will be deleted. You can set the expired time to 0, and then the file will
not be deleted. The actual keeping time for the file should be determined by the capacity of the HDD.
• Redundant Record: Enabling redundant record means you save the recording files in the redundant
HDD. See Chapter Configuring Redundant Recording.
• Record Audio: Check the checkbox to enable or disable audio recording.
• Video Stream: Main stream and sub-stream are selectable for recording. When you select
sub-stream, you can record for a longer time with the same storage space.
3) Click Apply to save the settings.
You can enable the ANR (Automatic Network Replenishment) function via the web browser (Configuration >
Storage > Schedule Settings > Advanced) to save the video files in the IP camera when the network is
disconnected, and synchronize the files to the NVR when the network is resumed.