
User Manual
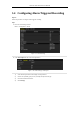
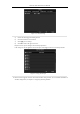
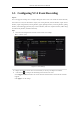
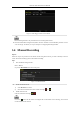
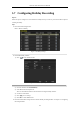
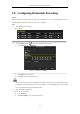
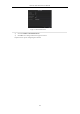
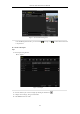
Table Of Contents
- Product Key Features
- Chapter 1 Introduction
- Chapter 2 Getting Started
- Chapter 3 Live View
- Chapter 4 PTZ Controls
- Chapter 5 Recording Settings
- 5.1 Configuring Parameters
- 5.2 Configuring Recording Schedule
- 5.3 Configuring Motion Detection Recording
- 5.4 Configuring Alarm Triggered Recording
- 5.5 Configuring VCA Event Recording
- 5.6 Manual Recording
- 5.7 Configuring Holiday Recording
- 5.8 Configuring Redundant Recording
- 5.9 Configuring HDD Group for Recording
- 5.10 Files Protection
- Chapter 6 Playback
- 6.1 Playing Back Record Files
- 6.2 Auxiliary Functions of Playback
- Chapter 7 Backup
- Chapter 8 Alarm Settings
- Chapter 9 VCA Alarm
- 9.1 Face Detection
- 9.2 Vehicle Detection
- 9.3 Line Crossing Detection
- 9.4 Intrusion Detection
- 9.5 Region Entrance Detection
- 9.6 Region Exiting Detection
- 9.7 Unattended Baggage Detection
- 9.8 Object Removal Detection
- 9.9 Audio Exception Detection
- 9.10 Sudden Scene Change Detection
- 9.11 Defocus Detection
- 9.12 PIR Alarm
- Chapter 10 VCA Search
- Chapter 11 Network Settings
- Chapter 12 HDD Management
- Chapter 13 Camera Settings
- Chapter 14 NVR Management and Maintenance
- Chapter 15 Others
- Chapter 16 Appendix

Network Video Recorder User Manual
85
5.8 Configuring Redundant Recording
Purpose:
Enabling redundant recording, which means saving the recording files not only in the R/W HDD but also in the
redundant HDD, will effectively enhance the data safety and reliability. .
Steps:
1. Enter HDD Information interface.
Menu > HDD
Figure 5. 22 HDD General
2. Select the HDD and click to enter the Local HDD Settings interface.
1) Set the HDD property to Redundancy.
Figure 5. 23 HDD General-Editing
2) Click Apply to save the settings.
3) Click OK to back to the upper level menu.
You must set the Storage mode in the HDD advanced settings to Group before you set the HDD property to
Redundant. For detailed information, please refer to Chapter 12.3.2 Setting HDD Property. There should
be at least another HDD which is in Read/Write status.
3. Enter the Record setting interface.
Menu > Record > Parameters
1) Select Record tab.
1) Click More Settings to enter the following interface.