
User Manual
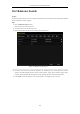
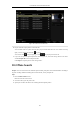

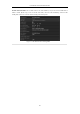
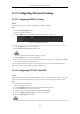
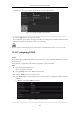
Table Of Contents
- Product Key Features
- Chapter 1 Introduction
- Chapter 2 Getting Started
- Chapter 3 Live View
- Chapter 4 PTZ Controls
- Chapter 5 Recording and Capture Settings
- 5.1 Configuring Parameters
- 5.2 Configuring Recording and Capture Schedule
- 5.3 Configuring Motion Detection Recording and Capture
- 5.4 Configuring Alarm Triggered Recording and Capture
- 5.5 Manual Recording and Continuous Capture
- 5.6 Configuring Holiday Recording and Capture
- 5.7 Configuring Redundant Recording and Capture
- 5.8 Configuring HDD Group for Recording and Capture
- 5.9 Files Protection
- Chapter 6 Playback
- 6.1 Playing Back Record Files
- 6.2 Auxiliary Functions of Playback
- Chapter 7 Backup
- Chapter 8 Alarm Settings
- Chapter 9 VCA Alarm
- 9.1 Face Recognition
- 9.2 Face Detection
- 9.3 Vehicle Detection
- 9.4 Line Crossing Detection
- 9.5 Intrusion Detection
- 9.6 Region Entrance Detection
- 9.7 Region Exiting Detection
- 9.8 Loitering Detection
- 9.9 People Gathering Detection
- 9.10 Fast Moving Detection
- 9.11 Parking Detection
- 9.12 Unattended Baggage Detection
- 9.13 Object Removal Detection
- 9.14 Audio Exception Detection
- 9.15 Sudden Scene Change Detection
- 9.16 Defocus Detection
- 9.17 PIR Alarm
- Chapter 10 VCA Search
- Chapter 11 Network Settings
- 11.1 Configuring General Settings
- 11.2 Configuring Advanced Settings
- 11.2.1 Configuring PPPoE Settings
- 11.2.2 Configuring EZVIZ Cloud P2P
- 11.2.3 Configuring DDNS
- 11.2.4 Configuring NTP Server
- 11.2.5 Configuring SNMP
- 11.2.6 Configuring More Settings
- 11.2.7 Configuring HTTPS Port
- 11.2.8 Configuring Email
- 11.2.9 Configuring NAT
- 11.2.10 Configuring High-speed Download
- 11.2.11 Configuring Virtual Host
- 11.3 Checking Network Traffic
- 11.4 Configuring Network Detection
- Chapter 12 RAID
- Chapter 13 HDD Management
- Chapter 14 Camera Settings
- Chapter 15 NVR Management and Maintenance
- Chapter 16 Others
- Chapter 17 Appendix

User Manual of Network Video Recorder
159
scanning tool of your phone to quickly get the code by scanning the QR code below.
Figure 11. 4 EZVIZ Cloud P2P Settings Interface
7. Click the Apply button to save and exit the interface.
After configuration, you can access and manage the NVR by your mobile phone on which the EZVIZ Cloud P2P
application is installed or by the EZVIZ website (www.ezviz7.com).
For more operation instructions, please refer to the help file on the EZVIZ official website (www.ezviz7.com).
11.2.3 Configuring DDNS
Purpose:
If your NVR is set to use PPPoE as its default network connection, you may set Dynamic DNS (DDNS) to be used
for network access.
Prior registration with your ISP is required before configuring the system to use DDNS.
Steps:
8. Enter the Network Settings interface.
Menu > Configuration > Network
9. Select the DDNS tab to enter the DDNS Settings interface.
10. Check the DDNS checkbox to enable this feature.
11. Select DDNS Type. Five different DDNS types are selectable: IPServer, DynDNS, PeanutHull, NO-IP and
HiDDNS.
• IPServer: Input Server Address for IPServer.
Figure 11. 5 IPServer Settings Interface