
User Manual
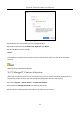
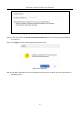
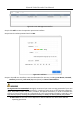
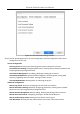

Table Of Contents
- Chapter 1 Introduction
- Chapter 2 Getting Started
- Chapter 3 Camera Management
- Chapter 4 Camera Settings
- Chapter 5 Live View
- Chapter 6 PTZ Control
- Chapter 7 Storage
- 7.1 Storage Device Management
- 7.2 Storage Mode
- 7.3 Recording Parameters
- 7.4 Configure Recording Schedule
- 7.5 Configure Continuous Recording
- 7.6 Configure Motion Detection Triggered Recording
- 7.7 Configure Event Triggered Recording
- 7.8 Configure Alarm Triggered Recording
- 7.9 Configure POS Event Triggered Recording
- 7.10 Configure Picture Capture
- 7.11 Configure Holiday Recording and Capture
- 7.12 Configure Redundant Recording and Capture
- Chapter 8 Disk Array
- Chapter 9 File Management
- Chapter 10 Playback
- Chapter 11 Event and Alarm Settings
- Chapter 12 VCA Event Alarm
- 12.1 Human Body Detection
- 12.2 Face Detection
- 12.3 Vehicle Detection
- 12.4 Line Crossing Detection
- 12.5 Intrusion Detection
- 12.6 Region Entrance Detection
- 12.7 Region Exiting Detection
- 12.8 Unattended Baggage Detection
- 12.9 Object Removal Detection
- 12.10 Audio Exception Detection
- 12.11 Sudden Scene Change Detection
- 12.12 Defocus Detection
- 12.13 PIR Alarm
- 12.14 Enable Smart Search
- Chapter 13 Smart Search
- Chapter 14 Human Body Detection
- Chapter 15 POS Configuration
- Chapter 16 Network Settings
- Chapter 17 Hot Spare Device Backup
- Chapter 18 System Maintenance
- Chapter 19 General System Settings
- Chapter 20 Appendix

Network Video Recorder User Manual
173
Auto Logout: Set timeout time for menu inactivity. E.g., when the timeout time is set to 5
Minutes, then the system will exit from the current operation menu to live view screen after
5 minutes of menu inactivity.
Mouse Pointer Speed: Set the speed of mouse pointer; 4 levels are configurable.
Enable Wizard: Enable/disable the Wizard when the device starts up.
Enable Password: Enable/disable the use of the login password.
Step 3 Click the Apply button to save the settings.
19.2 Configure Date & Time
Step 1 Go to System > General.
Step 2 Configure the date and time.
Time Zone: Select the time zone.
Date Format: Select the date format.
System Date: Select the system date.
System Time: Set the system time.
Figure 19-2 Date and Time Settings
Step 3 Click the Apply button to save the settings.