
Quick Start Guide

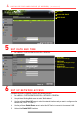

4 I N I T I A L I Z E T H E H A R D D R I V E ( I F N E E D E D ) ( c o n t i n u e d )
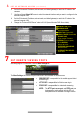
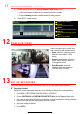
5 S E T D A T E A N D T I M E
1. Go to MENU > SYSTEM CONFIGURATION > GENERAL.
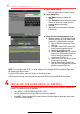
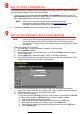
6 S E T U P N E T W O R K A C C E S S
A network connection is required to access the cameras remotely.
1. Go to MENU > SYSTEM CONFIGURATION > NETWORK > GENERAL.
2. Use pull-down Working Mode menu to select “Multi-address.”
3. Use the pull-down Select NIC menu to select the network interface card you want to configure as the
camera LAN (“LAN 1” or “LAN 2”).
4. Use the pull-down Default Route menu to select the NIC that is to connect to the cameras’ LAN.
5. Uncheck the Enable DHCP checkbox.
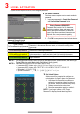
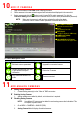
DATE/TIME
Date and time settings
TIME ZONE
Time zone and daylight savings
time settings
ENABLE NTP
Network Time Protocol settings
HDD LIST
TOTAL HDD SPACE
FREE SPACE