
User Manual
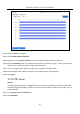
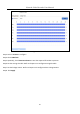

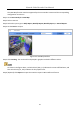
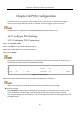
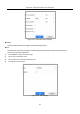
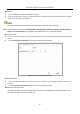
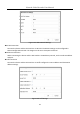
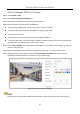
Table Of Contents
- Introduction
- Chapter 2 Getting Started
- Chapter 3 Camera Management
- Chapter 4 Camera Settings
- Chapter 5 Live View
- Chapter 6 PTZ Control
- Chapter 7 Storage
- 7.1 Storage Device Management
- 7.2 Storage Mode
- 7.3 Recording Parameters
- 7.4 Configure Recording Schedule
- 7.5 Configure Continuous Recording
- 7.6 Configure Motion Detection Triggered Recording
- 7.7 Configure Event Triggered Recording
- 7.8 Configure Alarm Triggered Recording
- 7.9 Configure POS Event Triggered Recording
- 7.10 Configure Picture Capture
- 7.11 Configure Holiday Recording and Capture
- 7.12 Configure Redundant Recording and Capture
- Chapter 8 Disk Array (RAID)
- Chapter 9 File Management
- Chapter 10 Playback
- Chapter 11 Event and Alarm Settings
- 11.1 Configure Arming Schedule
- 11.2 Configure Alarm Linkage Actions
- 11.3 Configure Motion Detection Alarms
- 11.4 Configure Video Loss Alarms
- 11.5 Configure Video Tampering Alarms
- 11.6 Configure Sensor Alarms
- 11.7 Configure Exceptions Alarms
- 11.8 Setting Alarm Linkage Actions
- 11.9 Trigger or Clear Alarm Output Manually
- Chapter 12 VCA Event Alarm
- 12.1 Face Detection
- 12.2 Vehicle Detection
- 12.3 Line Crossing Detection
- 12.4 Intrusion Detection
- 12.5 Region Entrance Detection
- 12.6 Region Exiting Detection
- 12.7 Unattended Baggage Detection
- 12.8 Object Removal Detection
- 12.9 Audio Exception Detection
- 12.10 Sudden Scene Change Detection
- 12.11 Defocus Detection
- 12.12 PIR Alarm
- 12.13 Thermal Camera Detection
- Chapter 13 Smart Analysis
- Chapter 14 POS Configuration
- Chapter 15 Network Settings
- Chapter 16 Hot Spare Device Backup
- Chapter 17 User Management and Security
- Chapter 18 System Service Maintenance
- Chapter 19 General System Settings
- Chapter 20 Appendix

Network Video Recorder User Manual
149
14.1.2 Configure POS Text Overlay
Step 1 Go to System > POS.
Step 2 Click Channel Linkage and Display tab.
Step 3 Select the linked channel to overlay the POS characters.
Step 4 Set the characters overlay for the enabled POS.
Character encoding format: currently the Latin-1 format is available
Overlay mode of the characters to display in scrolling or page mod
Font size and font color
Display time (sec) of the characters. The value ranges 5 -3600 sec.
Timeout of POS event. The value ranges 5 -3600 sec. When the device has not received the POS
message within the defined time, the transaction ends.
Step 5 In the Privacy Settings, set the POS privacy information to not display on the image, e.g., the card
number, user name, etc.
Step 6 Result: The defined privacy information will be displayed using ***on the image instead.
Step 7 (optional) Check the checkbox to enable the Overlay POS in Live View. When this feature is
enabled, the POS information is overlaid on the Live View image.
Figure 14-7 Overlay Character Settings
Drag the frame to adjust the textbox size and position on POS settings interface preview screen.