
User Manual
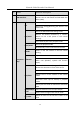
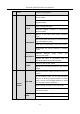
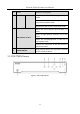
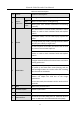
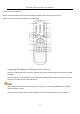
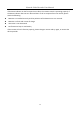
Table Of Contents
- Introduction
- Chapter 2 Getting Started
- Chapter 3 Camera Management
- Chapter 4 Camera Settings
- Chapter 5 Live View
- Chapter 6 PTZ Control
- Chapter 7 Storage
- 7.1 Storage Device Management
- 7.2 Storage Mode
- 7.3 Recording Parameters
- 7.4 Configure Recording Schedule
- 7.5 Configure Continuous Recording
- 7.6 Configure Motion Detection Triggered Recording
- 7.7 Configure Event Triggered Recording
- 7.8 Configure Alarm Triggered Recording
- 7.9 Configure POS Event Triggered Recording
- 7.10 Configure Picture Capture
- 7.11 Configure Holiday Recording and Capture
- 7.12 Configure Redundant Recording and Capture
- Chapter 8 Disk Array (RAID)
- Chapter 9 File Management
- Chapter 10 Playback
- Chapter 11 Event and Alarm Settings
- 11.1 Configure Arming Schedule
- 11.2 Configure Alarm Linkage Actions
- 11.3 Configure Motion Detection Alarms
- 11.4 Configure Video Loss Alarms
- 11.5 Configure Video Tampering Alarms
- 11.6 Configure Sensor Alarms
- 11.7 Configure Exceptions Alarms
- 11.8 Setting Alarm Linkage Actions
- 11.9 Trigger or Clear Alarm Output Manually
- Chapter 12 VCA Event Alarm
- 12.1 Face Detection
- 12.2 Vehicle Detection
- 12.3 Line Crossing Detection
- 12.4 Intrusion Detection
- 12.5 Region Entrance Detection
- 12.6 Region Exiting Detection
- 12.7 Unattended Baggage Detection
- 12.8 Object Removal Detection
- 12.9 Audio Exception Detection
- 12.10 Sudden Scene Change Detection
- 12.11 Defocus Detection
- 12.12 PIR Alarm
- 12.13 Thermal Camera Detection
- Chapter 13 Smart Analysis
- Chapter 14 POS Configuration
- Chapter 15 Network Settings
- Chapter 16 Hot Spare Device Backup
- Chapter 17 User Management and Security
- Chapter 18 System Service Maintenance
- Chapter 19 General System Settings
- Chapter 20 Appendix

Network Video Recorder User Manual
23
Table 1-2 Panel Description
No.
Name
Function Description
1
Status
Indicators
POWER
Turns green when device is powered up.
HDD
Blinks red when HDD is reading/writing.
Tx/Rx
Blinks green when network connection is functioning
normally.
2
ENTER
The Enter button is used to confirm selection in menu
mode; or used to check checkbox fields and ON/OFF
switch.
In playback mode, it can be used to play or pause the
video.
In single-frame play mode, pressing the Enter button
will play the video by a single frame.
In auto sequence view mode, the buttons can be used
to pause or resume auto sequence.
The Enter button is used to confirm selection in menu
mode; or used to check checkbox fields and ON/OFF
switch.
3
DIRECTION
In menu mode, the direction buttons are used to
navigate between different fields and items and select
setting parameters.
In playback mode, the Up and Down buttons are used
to speed up and slow down record playing, and the
Left and Right buttons are used to move the recording
30s forwards or backwards.
In the image setting interface, the up and down
button can adjust the level bar of the image
parameters.
In live view mode, these buttons can be used to switch
channels.
4
Back
Back to the previous menu.
5
POWER ON/OFF
Power on/off switch.
6
MENU
Access the main menu interface.
7
USB Interface
Universal Serial Bus (USB) ports for additional devices
such as USB mouse and USB Hard Disk Drive (HDD).