
User Manual


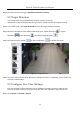
Table Of Contents
- Introduction
- Chapter 2 Getting Started
- Chapter 3 Camera Management
- Chapter 4 Camera Settings
- Chapter 5 Live View
- Chapter 6 PTZ Control
- Chapter 7 Storage
- 7.1 Storage Device Management
- 7.2 Storage Mode
- 7.3 Recording Parameters
- 7.4 Configure Recording Schedule
- 7.5 Configure Continuous Recording
- 7.6 Configure Motion Detection Triggered Recording
- 7.7 Configure Event Triggered Recording
- 7.8 Configure Alarm Triggered Recording
- 7.9 Configure POS Event Triggered Recording
- 7.10 Configure Picture Capture
- 7.11 Configure Holiday Recording and Capture
- 7.12 Configure Redundant Recording and Capture
- Chapter 8 Disk Array (RAID)
- Chapter 9 File Management
- Chapter 10 Playback
- Chapter 11 Event and Alarm Settings
- 11.1 Configure Arming Schedule
- 11.2 Configure Alarm Linkage Actions
- 11.3 Configure Motion Detection Alarms
- 11.4 Configure Video Loss Alarms
- 11.5 Configure Video Tampering Alarms
- 11.6 Configure Sensor Alarms
- 11.7 Configure Exceptions Alarms
- 11.8 Setting Alarm Linkage Actions
- 11.9 Trigger or Clear Alarm Output Manually
- Chapter 12 VCA Event Alarm
- 12.1 Face Detection
- 12.2 Vehicle Detection
- 12.3 Line Crossing Detection
- 12.4 Intrusion Detection
- 12.5 Region Entrance Detection
- 12.6 Region Exiting Detection
- 12.7 Unattended Baggage Detection
- 12.8 Object Removal Detection
- 12.9 Audio Exception Detection
- 12.10 Sudden Scene Change Detection
- 12.11 Defocus Detection
- 12.12 PIR Alarm
- 12.13 Thermal Camera Detection
- Chapter 13 Smart Analysis
- Chapter 14 POS Configuration
- Chapter 15 Network Settings
- Chapter 16 Hot Spare Device Backup
- Chapter 17 User Management and Security
- Chapter 18 System Service Maintenance
- Chapter 19 General System Settings
- Chapter 20 Appendix

Network Video Recorder User Manual
58
The fisheye expansion view feature is supported only by the DS-7600/7700/9600-I (/P) Series.
The connected camera must support the fisheye view.
Step 1 In the Live View mode, click to enter the fisheye expansion mode.
Step 2 Select the expansion view mode.
180° Panorama ( ): Switch the Live View image to the 180° panorama view.
360° Panorama ( ): Switch the Live View image to the 360° panorama view.
PTZ Expansion ( ): The PTZ Expansion is the close-up view of some defined area in the
fisheye view or panorama expansion. It supports the electronic PTZ function, also called e-PTZ.
Radial Expansion ( ): In radial expansion mode, the whole wide-angle view of the fisheye
camera is displayed. This view mode is called Fisheye View because it approximates the vision of a
fish’s convex eye. The lens produces curvilinear images of a large area, while distorting the
perspective and angles of objects in the image.
5.1.3 3D Positioning
3D Positioning zooms in/out of a specific live image area.
Step 1 In Live View mode, click the to enter the 3D positioning mode.
Step 2 Zoom in/out of the image.
Zoom In
Use the left mouse key to click on the desired position in the video image and drag a rectangle
area in the lower right direction to zoom in.
Zoom Out
Use the left mouse key to drag a rectangle area in the upper left direction to move the position to
the center and enable the rectangle area to zoom out.
5.1.4 Live View Strategy
Step 1 In Live View mode, click to enter the digital zoom operation interface in full screen mode.