
User Manual
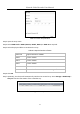
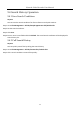
Table Of Contents
- Introduction
- Chapter 2 Getting Started
- Chapter 3 Camera Management
- Chapter 4 Camera Settings
- Chapter 5 Live View
- Chapter 6 PTZ Control
- Chapter 7 Storage
- 7.1 Storage Device Management
- 7.2 Storage Mode
- 7.3 Recording Parameters
- 7.4 Configure Recording Schedule
- 7.5 Configure Continuous Recording
- 7.6 Configure Motion Detection Triggered Recording
- 7.7 Configure Event Triggered Recording
- 7.8 Configure Alarm Triggered Recording
- 7.9 Configure POS Event Triggered Recording
- 7.10 Configure Picture Capture
- 7.11 Configure Holiday Recording and Capture
- 7.12 Configure Redundant Recording and Capture
- Chapter 8 Disk Array (RAID)
- Chapter 9 File Management
- Chapter 10 Playback
- Chapter 11 Event and Alarm Settings
- 11.1 Configure Arming Schedule
- 11.2 Configure Alarm Linkage Actions
- 11.3 Configure Motion Detection Alarms
- 11.4 Configure Video Loss Alarms
- 11.5 Configure Video Tampering Alarms
- 11.6 Configure Sensor Alarms
- 11.7 Configure Exceptions Alarms
- 11.8 Setting Alarm Linkage Actions
- 11.9 Trigger or Clear Alarm Output Manually
- Chapter 12 VCA Event Alarm
- 12.1 Face Detection
- 12.2 Vehicle Detection
- 12.3 Line Crossing Detection
- 12.4 Intrusion Detection
- 12.5 Region Entrance Detection
- 12.6 Region Exiting Detection
- 12.7 Unattended Baggage Detection
- 12.8 Object Removal Detection
- 12.9 Audio Exception Detection
- 12.10 Sudden Scene Change Detection
- 12.11 Defocus Detection
- 12.12 PIR Alarm
- 12.13 Thermal Camera Detection
- Chapter 13 Smart Analysis
- Chapter 14 POS Configuration
- Chapter 15 Network Settings
- Chapter 16 Hot Spare Device Backup
- Chapter 17 User Management and Security
- Chapter 18 System Service Maintenance
- Chapter 19 General System Settings
- Chapter 20 Appendix

Network Video Recorder User Manual
90
Step 2 Check Enable RAID.
Step 3 Click Apply.
Step 4 Reboot the device to have settings take effect.
8.1.2 One-Touch Creation
Purpose
One-touch configuration creates the disk array. By default, the array type created by one-touch
configuration is RAID 5.
Before You Start
Enable the RAID function. For details, refer to Chapter 8.1.1 Enable a RAID.
Install at least 3 HDDs. If more than 10 HDDs are installed, 2 arrays will be created. To maintain
reliability and stability running of the HDDs, it is recommended to use of enterprise-level HDDs of
the same model and capacity.
Step 1 Go to Storage > RAID Setup > Physical Disk.
Figure 8-2 Physical Disk
Step 2 Click One-touch Config.
Step 3 Edit the array name in Array Name and click OK to start configuring.
If you install 4 or more HDDs, a hot spare disk for array rebuilding will be created.
Step 4 When a message box pops up when the array creation is completed, click OK on it.
Step 5 Optionally, the device will automatically initialize the created array. Go to Storage > RAID Setup >
Array to view the information of the created arrray.
8.1.3 Manual Creation
Purpose
Manually create a RAID 0, RAID 1, RAID 5, RAID 6, or RAID 10 array.
Step 1 Go to Storage > RAID Setup > Physical Disk.
Step 2 Click Create.