
User Manual

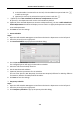


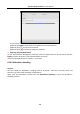


Table Of Contents
- Chapter 1 Overview
- Chapter 2 Appearance
- Chapter 3 Installation
- Chapter 4 Terminal Connection
- Chapter 5 Wiring Description
- Chapter 6 Activating Access Control Terminal
- Chapter 7 Basic Operation
- Chapter 8 Client Operation
- 8.1 Function Module
- 8.2 User Registration and Login
- 8.3 System Configuration
- 8.4 Access Control Management
- 8.4.1 Adding Access Control Device
- 8.4.2 Viewing Device Status
- 8.4.3 Editing Basic Information
- 8.4.4 Network Settings
- 8.4.5 Capture Settings
- 8.4.6 RS-485 Settings
- 8.4.7 Wiegand Settings
- 8.4.8 Authenticating M1 Card Encryption
- 8.4.9 Remote Configuration
- Checking Device Information
- Editing Device Name
- Editing Time
- Setting System Maintenance
- Managing User
- Setting Security
- Configuring Network Parameters
- Configuring Upload Method
- Configuring Network Center
- Configuring Advanced Network
- Configuring Wi-Fi
- Configuring Relay Parameters
- Configuring Access Control Parameters
- Uploading Background Picture
- Configuring Face Detection Parameters
- Operating Relay
- Viewing Relay Status
- 8.5 Organization Management
- 8.6 Person Management
- 8.7 Schedule and Template
- 8.8 Permission Configuration
- 8.9 Advanced Functions
- 8.10 Searching Access Control Event
- 8.11 Access Control Event Configuration
- 8.12 Door Status Management
- 8.13 Arming Control
- 8.14 Time and Attendance
- Appendix A Tips for Scanning Fingerprint
- Appendix B Custom Wiegand Rule Descriptions

Access Control Terminal·User Manual
129
3. Select the leave and business trip type from the Type drop-down list.
You can configure the leave type in Advanced Settings. For details, refer to Chapter 0 Leave
Type Settings.
4. Click to set the specified time as time range.
5. Click Employee Name field and select the person for this application.
You can also input the keyword and click to search the person you want.
6. (Optional) Input the remark information as desired.
7. Click Add to add the leave and business trip.
The added leave and business trip will display on the Attendance Handling interface.
(Optional) Select the leave and business trip and click Modify to edit the leave or business trip.
(Optional) Select the leave and business trip and click Delete to delete the leave or business
trip.
(Optional) Click Report to generate the leave or business trip report.
(Optional) Click Export to export the leave or business trip details to local PC.
Note: The exported details are saved in *.csv format.
Search Leave and Business Trip
Steps:
1. Click Leave and Business Trip tab.
2. Set the searching conditions.
Department: Select the department from the drop-down list.
Name: Input the person name.
Time: Click to set the specified time as time range.
3. Click Search to search the leave and business trips.
The leave and business trip details will display on the list.
You can also click Reset to reset the searching conditions.
Manual Calculation of Attendance
Purpose:
You can calculate the attendance result manually if needed by specifying the start time and end
time.
Steps:
1. Click Manual Calculation of Attendance tab.
2. Set the start time and end time for calculation.
3. Click Calculate to start.
Note: It can only calculate the attendance data within three months.