
User Manual

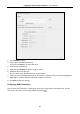
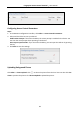
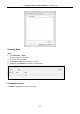
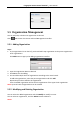
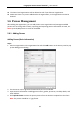

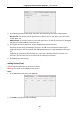
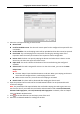

Table Of Contents
- Chapter 1 Overview
- Chapter 2 Installation
- Chapter 3 Device Wiring
- Chapter 4 Basic Operation
- 4.1 Device Activation
- 4.2 Login
- 4.3 Parameters Configuration
- 4.4 User Management
- 4.5 Access Control System Configuration
- 4.6 Attendance Configuration
- 4.7 Other Management
- Chapter 5 Client Operation
- 5.1 Function Module
- 5.2 User Registration and Login
- 5.3 System Configuration
- 5.4 Access Control Management
- 5.4.1 Adding Access Control Device
- 5.4.2 Viewing Device Status
- 5.4.3 Editing Basic Information
- 5.4.4 Network Settings
- 5.4.5 RS-485 Settings
- 5.4.6 Wiegand Settings
- 5.4.7 M1 Card Encryption
- 5.4.8 Remote Configuration
- Checking Device Information
- Editing Device Name
- Editing Time
- Setting System Maintenance
- Managing User
- Setting Security
- Configuring Network Parameters
- Configuring Upload Method
- Configuring Network Center Parameters
- Configuring Advanced Network
- Configuring Wi-Fi
- Configuring Relay Parameters
- Configuring Access Control Parameters
- Uploading Background Picture
- Operating Relay
- Viewing Relay Status
- 5.5 Organization Management
- 5.6 Person Management
- 5.6.1 Adding Person
- Adding Person (Basic Information)
- Adding Person (Basic Information)
- Adding Person (Permission)
- Adding Person (Card)
- Adding Person (Fingerprint)
- Adding Person (Attendance Rule)
- Importing and Exporting Person Information
- Getting Person Information from Access Control Device
- Modifying and Deleting Person
- Changing Person to Other Organization
- Issuing Card in Batch
- 5.6.1 Adding Person
- 5.7 Schedule and Template
- 5.8 Permission Configuration
- 5.9 Advanced Functions
- 5.10 Searching Access Control Event
- 5.11 Access Control Event Configuration
- 5.12 Door Status Management
- 5.13 Arming Control
- 5.14 Time and Attendance
- Appendix A Tips for Scanning Fingerprint
- Appendix B Input Method Operation
- Appendix C Attendance Record Delete Rule
- Appendix D Overview of Device Parameters
- Appendix E Attendance Report Table
- Appendix F Custom Wiegand Rule Descriptions

Fingerprint Access Control Terminal·User Manual
89
Access Controller Reader: Place the card on the reader of the Access Controller and click
Read to get the card No.
Card Enrollment Station: Place the card on the Card Enrollment Station and click Read to
get the card No.
Note: The Card Enrollment Station should connect with the PC running the client. You can
click Set Card Enrollment Station to enter the following dialog.
1) Select the Card Enrollment Station type.
Note: Currently, the supported card reader types include DS-K1F100-D8, DS-K1F100-M,
DS-K1F100-D8E, and DS-K1F180-D8E.
2) Set the serial port No., the baud rate, the timeout value, the buzzing, or the card No.
type.
If the card is M1 card, and if you need to enable the M1 Card Encryption function, you
should check Enable checkbox of M1 Card Encryption and click Modify to select the
sector.
Notes:
The M1 Card Encryption function is supported by DS-K1F100-D8, DS-K1F100-D8E,
and DS-K1F180-D8E.
For fingerprint access control terminal and fingerprint time attendance terminal,
DS-K1T803MF and DS-K1T804MF device support the function.
3) Click Save button to save the settings.
You can click Restore Default Value button to restore the defaults.
Manually Input: Input the card No. and click Enter to input the card No.
7. Click OK and the card(s) will be issued to the person.
8. (Optional) You can select the added card and click Modify, Delete or QR Code to edit or delete
the card or generate the QR code for the card.
9. (Optional) You can generate and save the card QR code for QR code authentication.
1) Select an added card and click QR Code to generate the card QR code.
2) In the QR code pop-up window, click Download to save the QR code to the local PC.
You can print the QR code for authentication on the specified device.