Wi-Fi Video Doorbell User Manual
User Manual © 2018 Hangzhou Hikvision Digital Technology Co., Ltd. About this Manual This Manual is subject to domestic and international copyright protection. Hangzhou Hikvision Digital Technology Co., Ltd. ("Hikvision") reserves all rights to this manual. This manual cannot be reproduced, changed, translated, or distributed, partially or wholly, by any means, without the prior written permission of Hikvision. Please use this user manual under the guidance of professionals.
Regulatory Information FCC Information Please take attention that changes or modification not expressly approved by the party responsible for compliance could void the user’s authority to operate the equipment. FCC compliance: This equipment has been tested and found to comply with the limits for a Class A digital device, pursuant to part 15 of the FCC Rules. These limits are designed to provide reasonable protection against harmful interference when the equipment is operated in a commercial environment.
(2) this device must accept any interference, including interference that may cause undesired operation of the device. Le présent appareil est conforme aux CNR d'Industrie Canada applicables aux appareils radioexempts de licence. L'exploitation est autorisée aux deux conditions suivantes : (1) l'appareil ne doit pas produire de brouillage, et (2) l'utilisateur de l'appareil doit accepter tout brouillage radioélectrique subi, même si le brouillage est susceptible d'en compromettre le fonctionnement.
All the electronic operation should be strictly compliance with the electrical safety regulations, fire prevention regulations and other related regulations in your local region. Please use the power adapter, which is provided by normal company. The power consumption cannot be less than the required value. Do not connect several devices to one power adapter as adapter overload may cause over-heat or fire hazard.
MSA-C1500IC12.0-18P-US TS-A018-120015AD MSA-C2000IC12.0-24P-US ADS-26FSG-1212024EPCU MSA-C1500IC12.0-18P-DE ADS-25FSG-1212018GPG MSA-C2000IC12.0-24P-DE ADS-24S-121224GPG MSA-C1500IC12.0-18P-GB ADS-25FSG-1212018GPB MSA-C2000IC12.0-24P-GB ADS-24S-121224GPB MSA-C1500IC12.0-18P-A U ADS-25FSG-1212018GPSA MSA-C2000IC12.0-24P-A U MSA-C1500IC12.0-18P-BR ADS-25FSG-12 12018GPBR MSA-C2000IC12.0-24P-BR 1.5A MOSO POWER SUPPLY TECHNOLOGY CO.,LTD NEMA 1.5A SHENZHEN TRANSIN TECHNOLOGIES CO.
ADS-24S-12 1224GPBR TS-A018-120015N5 ADS-25FSG-12 12018GPI ADS-26FSG-12 12024EPI ADS-24S-12 1224GPI ADS-26FSG-12 12024EPI ADS-24S-12 1224GPI 2A SHENZHEN HONOR ELECTRONIC CO.,LTD NBR 1.5A MOSO POWER SUPPLY TECHNOLOGY CO.,LTD IS 1.5A SHENZHEN HONOR ELECTRONIC CO.,LTD IS 2A SHENZHEN HONOR ELECTRONIC CO.,LTD IS 2A SHENZHEN HONOR ELECTRONIC CO.,LTD IS 2A SHENZHEN HONOR ELECTRONIC CO.,LTD IS 2A SHENZHEN HONOR ELECTRONIC CO.
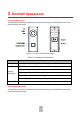
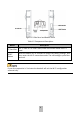
1 Doorbell Appearance Front and Rear Panels You can see the camera, call button, and crews for wiring on the doorbell on the front panel and the rear panel. Figure 1-1 Front Panel and Rear Panel Table 1-1 Components Description Name IR Light Description Auto light source for night vision. The lights are behind the panel. Solid blue: The doorbell is starting up and running properly. Cycling blue and red: Wi-Fi is not connected. Button Backlights Flashing red: The doorbell is upgrading.
Figure 1-2 Side Panel and Bottom Panel Table 1-2 Components Description Name Description TF Card Slot For TF card. If a TF card is used, video files will be stored in the TF card. RESET Button Hold the button for 15 seconds to restore the factory settings, and then enter the Wi-Fi connection mode. The call backlight cycles blue and red. If you do no operation in 3 minutes the doorbell will exit the Wi-Fi configuration automatically.
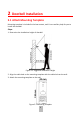
2 Doorbell Installation 2.1 Attach Mounting Template Mounting template is included in the box content, and it is an auxiliary help for you to install the doorbell. Steps 1. Determine the installation height of doorbell. Figure 2-1 Suggested Installation Height 2. Align the cable hole on the mounting template with the cable hole on the wall. 3. Attach the mounting template on the wall.
2.2 Connect Power Cables Before You Start Make sure you have powered off the main power switch of your home. Steps 1. Loosen the screws on the rear panel of the doorbell, put loops of power cables (included in the box content) into the screws, and then tighten them. Figure 2-3 Connect Included Power Cables 2. Drill a cable hole on the wall which should be align with the hole on the mounting template. 3. Pull the power cables from the wall, and connect to the power connector. 4.
Steps 1. Remove the faceplate attached on the doorbell to view the front panel and side panel of the doorbell. 2. Remove the card slot cover. 3. Insert the TF card into the card slot on the side of the doorbell. 4. Cover the TF card slot. Figure 2-5 Install TF Card Motion detection does not support recording without the TF card. 2.4 Install Doorbell Before You Start Make sure you have powered off the main power switch of your home. Make sure you have connected power cables of the doorbell. Steps 1.
Figure 2-6 Insert Expansion Tube 2. Route the cables and insert cables and power connector into the drilled cable hole. 3. Align the screw holes on the doorbell body with drilled holes on the wall. 4. Fix the doorbell body to the wall tightly with 2 screws. Figure 2-7 Install Doorbell 5. Put the faceplate to cover the doorbell body. 6. Use 1 set screw to fix the faceplate with the doorbell body tightly.
3 Getting Started Getting Started section provides the quick usage guide to the doorbell and its related application. 3.1 Set up Hik-Connect App Hik-Connect App is necessary for the doorbell configuration and operation. Before You Start Make sure your mobile device has been connected to Wi-Fi. Steps 1. Install Hik-Connect App and register a user account for iOS and Android. 1) Search “Hik-Connect” in App Store or Google Play™ to download and install the App.
Connect Wi-Fi You should set the Wi-Fi connection before adding the doorbell to the App and operating the doorbell. Steps 1. In the Home page of the App, tap More -> Settings -> Wi-Fi Settings to enter the Wi-Fi settings page. 2. Input the wireless network name and password that your mobile phone has connected to. 3. Tap Generate to generate a QR code. 4. Use the camera of the doorbell to scan the QR code, so as to finish the Wi-Fi connection.
2. Scan the QR code or input the serial No. on the front panel of the doorbell body. Activation page pops up after finishing the Wi-Fi connection. The suggested scanning distance is 5 to 10 cm. The doorbell gives a beep for success. 3. Activate the doorbell. 1) Tap Set Device Password and input a password to activate the doorbell. 2) Tap Activate in the next page to finish activating. 4. Optional: Input the verification code of the doorbell in the pop-up page after activation.
You will hear the voice prompt “Start configuring Wi-Fi”. 4) Tap Next in 3 minutes to start the Wi-Fi connection. Activation page pops up after finishing the Wi-Fi connection. 4. Activate the doorbell. 1) Tap Set Device Password and input a password to activate the doorbell. 2) Tap Activate in the next page to finish activating. 5. Optional: Input the verification code of the doorbell in the pop-up page after activation. This step is only necessary for adding the doorbell by inputting the serial No..
4 Doorbell Operation Via the Hik-Connect App, you can realize some certain functions of the doorbell (including, but not limited to, live view, and remote playback). Video Intercom Press Call Button on the doorbell. You can accept the call via the Hik-Connect App, get the live view of the doorbell, and capture the snapshots. Live View Launch the Hik-Connect App and you can get the live view of the connected devices. Playback Launch the Hik-Connect App, tap a connected device and tap Gallery to play back.
UD08001B 18