
Configuration Manual
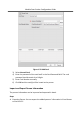
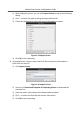
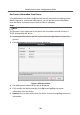
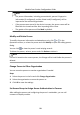
Table Of Contents
- Legal Information
- Symbol Conventions
- Regulatory Information
- 1 Device Configuration
- 2 Video Intercom Operation

Steps
•
For one person, you can add up to 4 access groups to one access control point of
one device.
•
You can add up to 128 access groups in total.
•
When the access group
sengs are changed, you need to apply the access
groups to the devices again to take eect. The access group changes include
changes of template, access group sengs, person's access group sengs, and
related person details (including card number, ngerprint, face picture, linkage
between card number and
ngerprint, linkage between card number and
ngerprint, card password, card eecve period, etc).
1.
Click Access Control → Access Group to enter the Access Group interface.
2.
Click Add to open the Add window.
3.
In the Name text eld, create a name for the access group as you want.
4.
Select a template for the access group.
Note
You should congure the template before access group sengs. Refer to for
details.
5.
In the le list of the Select Person eld, select person(s) and the person(s) will be
added to the selected list .
6.
In the le list of the Select Door eld, select door(s) or door staon(s) for the
selected persons to access, and the selected door(s) or door staon(s) will be
added to the selected list.
7.
Click OK.
8.
Aer adding the access groups, you need to apply them to the access control
device to take
eect.
1) Select the access group(s) to apply to the access control device.
To select mulple access groups, you can hold the Ctrl or Shi key and select
access groups.
2) Click Apply All to Devices to start applying all the selected access group(s) to
the access control device or door staon.
Module Door
Staon Conguraon Guide
30