Video Intercom Door Station (V Series) Quick Start Guide UD02938B
Video Intercom Door Station·Quick Start Guide Quick Start Guide © 2016 Hangzhou Hikvision Digital Technology Co., Ltd. This quick start guide is intended for users of the models below: Series Model DS-KV8102-IM DS-KV8202-IM Door Station (V Series) DS-KV8402-IM DS-KV8102-IP DS-KV8102-VP It includes instructions on how to use the Product. The software embodied in the Product is governed by the user license agreement covering that product.
Video Intercom Door Station·Quick Start Guide FOR LOSS OF BUSINESS PROFITS, BUSINESS INTERRUPTION, SECURITY BREACHES, OR LOSS OF DATA OR DOCUMENTATION, IN CONNECTION WITH THE USE OF OR RELIANCE ON THIS MANUAL, EVEN IF HIKVISION HAS BEEN ADVISED OF THE POSSIBILITY OF SUCH DAMAGES. SOME JURISDICTIONS DO NOT ALLOW THE EXCLUSION OR LIMITATION OF LIABILITY OR CERTAIN DAMAGES, SO SOME OR ALL OF THE ABOVE EXCLUSIONS OR LIMITATIONS MAY NOT APPLY TO YOU.
Video Intercom Door Station·Quick Start Guide Regulatory Information FCC Information Please take attention that changes or modification not expressly approved by the party responsible for compliance could void the user’s authority to operate the equipment. FCC compliance: This equipment has been tested and found to comply with the limits for a Class B digital device, pursuant to part 15 of the FCC Rules.
Video Intercom Door Station·Quick Start Guide 2006/66/EC (battery directive): This product contains a battery that cannot be disposed of as unsorted municipal waste in the European Union. See the product documentation for specific battery information. The battery is marked with this symbol, which may include lettering to indicate cadmium (Cd), lead (Pb), or mercury (Hg). For proper recycling, return the battery to your supplier or to a designated collection point. For more information see: www.recyclethis.
Video Intercom Door Station·Quick Start Guide Safety Instruction These instructions are intended to ensure that user can use the product correctly to avoid danger or property loss. The precaution measure is divided into Warnings and Cautions: Warnings: Neglecting any of the warnings may cause serious injury or death. Cautions: Neglecting any of the cautions may cause injury or equipment damage. Warnings Follow these safeguards to prevent serious injury or death.
Video Intercom Door Station·Quick Start Guide Exposing the equipment to direct sun light, low ventilation or heat source such as heater or radiator is forbidden (ignorance can cause fire danger). Do not aim the device at the sun or extra bright places. A blooming or smear may occur otherwise (which is not a malfunction however), and affecting the endurance of sensor at the same time.
Video Intercom Door Station·Quick Start Guide Table of Contents 1 Appearance .................................................................................................. 1 1.1 Appearance of DS-KV8X02-IM ................................................................................. 1 1.2 Appearance of DS-KV8102-XP.................................................................................. 2 2 Terminals and Interfaces ...........................................................................
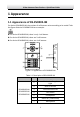
Video Intercom Door Station·Quick Start Guide 1 Appearance 1.1 Appearance of DS-KV8X02-IM For device DS-KV8X02-IM, the number of call buttons varies according to its model. Take the figure of device DS-KV8402-IM as an example. For device DS-KV8102-IM, there is only 1 call button. For device DS-KV8202-IM, there are 2 call buttons. For device DS-KV8402-IM, there are 4 call buttons.
Video Intercom Door Station·Quick Start Guide Models No. Description 8 Tamper Button You need not customize the Room No. for device DS-KV8102-IM. Default settings of call button: when you press the call button, it calls the resident; and when you hold down the call button, it calls the center. You can change the calling mode of the call button via Batch Configuration Tool or iVMS-4200 client software. See User Manual for detail steps. 1.
Video Intercom Door Station·Quick Start Guide 7 Loudspeaker Default settings of call button: when you press the call button, it calls the resident; and when you hold down the call button, it calls the center. You can change the calling mode of the call button via Batch Configuration Tool or iVMS-4200 client software. See User Manual for detail steps.
Video Intercom Door Station·Quick Start Guide 2 Terminals and Interfaces Please refer to the following figure for terminals and interfaces of door station. ①-⑤ ⑥-⑦ ⑧-⑨ ⑩-⑫ ⑬ Figure 2-1 Terminals and Interfaces Table 2-1 Descriptions of Terminals and Interfaces Terminals and Interfaces Name ALARM IN No.
Video Intercom Door Station·Quick Start Guide 3 Installation and Wiring 3.1 Installation of DS-KV8X02-IM To install the door station onto the wall, you are required to utilize a matched gang box. 3.1.1 Gang Box for DS-KV8X02-IM Please refer to the following figures for the dimensions of gang box for DS-KV8102-IM/ DS-KV8202-IM/ DS-KV8402-IM door station. 97 100 168 45 49 54 73.
Video Intercom Door Station·Quick Start Guide The dimensions above are theoretical. The actual size can be slightly different from the theoretical dimension. 3.1.2 Wall Mounting with Gang Box of DS-KV8X02-IM Steps: 1. Take the gang box and screws from the packing box. 2. Chisel a hole in the wall for inserting the gang box. The size of the hole should be 90 (width) ×170 (length) × 38(depth) mm. 3. Insert the gang box into the hole and fix it with 4 PA4 screws, as shown in the figure below.
Video Intercom Door Station·Quick Start Guide 5. After inserting the door station into the gang box, pull the device downwards to hook the door station with the gang box. 6. Secure the door station by inserting the fixing screw according to the direction of the arrow of the figure below. M4 Screw Figure 3-4 Secure the Door Station (DS-KV8X02-IM) 3.2 Installation of DS-KV8102-XP 3.2.
Video Intercom Door Station·Quick Start Guide The dimension of gang box for model DS-KV8102-IP/ DS-KV8102-VP door station is: 75 (width) × 75 (length) × 50 (depth) mm. The dimensions above are theoretical. The actual size can be slightly different from the theoretical dimension. 3.2.2 Wall Mounting with Gang Box of DS-KV8102-XP Steps: 1. Take the gang box, installation plate and screws from the packing box. 2. Chisel a hole in the wall for inserting the gang box.
Video Intercom Door Station·Quick Start Guide 6. After installing the installation plate, install the door station by inserting the rear component into the hollow area of the installation plate. While inserting the door station into the installation plate, incline the device by 5~10°, as shown in the figure below. Hollow Area Rear Component Figure 3-8 Install the Door Station (DS-KV8102-XP) 7.
Video Intercom Door Station·Quick Start Guide 3.3 Wiring Description 3.3.1 Door Lock Wiring Figure 3-10 Door Lock Wiring Terminal DR_NC/DR_COM is set as default for connecting magnetic lock/electric bolt; terminal DR_NO/DR_COM is set as default for connecting electric strike. To connect electric lock, it is required to set the output of terminal DR_NC/DR_COM/DR_NO to be electric lock with Batch Configuration Tool or iVMS-4200 client software.
Video Intercom Door Station·Quick Start Guide 3.3.2 Door Magnetic Wiring Figure 3-11 Door Magnetic Wiring To connect door magnetic, it is required to set the input of one alarm in terminal (ALARM_1, ALARM_2, ALARM_3, or ALARM_4) to be door magnetic with Batch Configuration Tool or iVMS-4200 client software. 3.3.
Video Intercom Door Station·Quick Start Guide To connect exit button, it is required to set the input of one alarm in terminal (ALARM_1, ALARM_2, ALARM_3, or ALARM_4) to be exit button with Batch Configuration Tool or iVMS-4200 client software. 3.3.
Video Intercom Door Station·Quick Start Guide 4 Before You Start For the first time use of the device, you are required to activate the device. You can activate the device and set the device password via internet with Batch Configuration Tool, or with iVMS-4200 client software. To activate the device with Batch Configuration Tool or iVMS-4200, refer to Chapter 5. Please refer to 5.1 for creating the device password.
Video Intercom Door Station·Quick Start Guide 5 Remote Operation via Batch Configuration Tool 5.1 Activating Device Remotely Purpose: You are required to activate the device first by setting a strong password for it before you can use the device. Activation via Batch Configuration Tool, and Activation via iVMS-4200 are supported. Here take activation via Batch Configuration Tool as example to introduce the device activation. Please refer to the user manual for the activation via iVMS-4200. Steps: 1.
Video Intercom Door Station·Quick Start Guide STRONG PASSWORD RECOMMENDED– We highly recommend you create a strong password of your own choosing (Using a minimum of 8 characters, including at least three of the following categories: upper case letters, lower case letters, numbers, and special characters.) in order to increase the security of your product.
Video Intercom Door Station·Quick Start Guide Figure 5-4 Editing Network Parameters The default port No. is 8000. After editing the network parameters of device, you should add the devices to the device list again. 5.3 Adding Device For batch configuration tool and iVMS-4200 software, you should add device to the software so as to configure the device remotely.
Video Intercom Door Station·Quick Start Guide Figure 5-6 Login Dialog Box 3. Enter the user name and password. 4. Click the OK button to save the settings. Only devices successfully logged in will be added to the device list for configuration. If you add devices in batch, please make sure selected devices have the same user name and password. 5.3.2 Adding by IP Address Purpose: You can add the device by entering IP address. Steps: 1. Click the button to pop up the adding devices dialog box.
Video Intercom Door Station·Quick Start Guide Figure 5-8 Adding by IP Address 4. Click the OK button to add the device to the device list. You cannot add the device(s) to the device list if the user name and password are not identical. When you add devices by IP Address, or IP Segment, the devices should be online devices.
Video Intercom Door Station·Quick Start Guide 6 Local Operation 6.1 Calling Resident 6.1.1 Calling Resident (DS-KV8X02-IM) You can call the resident by pressing the call button. For device DS-KV8X02- IM, the number of call buttons varies according to its model. Take the figure of device DS-KV8402-IM as an example. For device DS-KV8102-IM, there is only 1 call button. For device DS-KV8202-IM, there are 2 call buttons. For device DS-KV8402-IM, there are 4 call buttons.
Video Intercom Door Station·Quick Start Guide When the video intercom between you and the resident is realized, you can speak to the resident, and the live view of door station will be displayed on the connected indoor station. When live view of door station is displayed on other devices or door station is calling resident, the door station will detect the brightness of video. When the brightness is lower than the expected threshold, the supplement light will be enabled.
Video Intercom Door Station·Quick Start Guide When the video intercom between you and the resident is realized, you can speak to the resident, and the live view of door station will be displayed on the connected indoor station. When live view of door station is displayed on other devices or door station is calling resident, the door station will detect the brightness of video. When the brightness is lower than the expected threshold, the supplement light will be enabled.
Video Intercom Door Station·Quick Start Guide 6.3 Unlocking Door Purpose: After issuing cards, you can unlock the door by swiping the issued card. Step: 1. Swipe the card on the card induction area. 2. Hear a voice prompt of the device: Door is open. You cannot unlock the door by swiping the main card.
Video Intercom Door Station·Quick Start Guide Appendix Installation Notice While installing the door station, please make sure that the distance between any two devices is far as possible to avoid the howling and echo. The distance between two devices is recommended to be longer than 10 meters. Devices here refer to indoor station, door station, doorphone and master station. Wiring Cables Cable Specification Power Cord of Door Station RVV 2*1.
Video Intercom Door Station·Quick Start Guide 24