ECI-B12F2 • ECI-B12F4 • ECI-B12F6 Network Bullet Camera Quick Start Guide
ECI-B12Fx Network Bullet Camera Quick Start Guide Manual Illustrations and Features Graphics (screen shots, product pictures, etc.) in this document are for illustrative purposes only. Your actual product may differ in appearance. Your product might not support all features discussed in this document. Hikvision USA Inc., 18639 Railroad St.
Safety Instruction These instructions are intended to ensure that user can use the product correctly to avoid danger or property loss. The precaution measure is divided into “Warnings” and “Cautions”. Warnings: Serious injury or death may occur if any of the warnings are neglected. Cautions: Injury or equipment damage may occur if any of the cautions are neglected. Warnings Follow these safeguards to prevent serious injury or death.
ECI-B12Fx Network Bullet Camera Quick Start Guide Contents 1 Introduction ............................................................................................................................ 5 1.1 Product Features .............................................................................................................. 5 1.2 Camera Overview ............................................................................................................. 5 2 Installation .............................
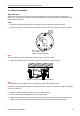
ECI-B12Fx Network Bullet Camera Quick Start Guide 1 Introduction 1.1 Product Features The main features are as follows: High performance CMOS sensor IR cut filter with auto switch OSD menu with configurable parameters Auto white balance Internal synchronization SMART IR mode 3-axis adjustment 1.2 Camera Overview Figure 1-1 Overview of Camera Note: Press and hold the switch button until screen goes blank (~7 seconds) to switch the video output.
ECI-B12Fx Network Bullet Camera Quick Start Guide 2.1 Camera Installation Before You Start: Both wall mounting and ceiling mounting are suitable for the camera. Ceiling mounting will be taken as an example in this section. You can take the steps of ceiling mounting as a reference, when adopting wall mounting. Steps: 1. Paste the drill template (supplied) to the place where you want to install the camera. 2. Drill the screw holes and the cable hole (optional) in the ceiling according to the drill template.
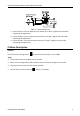
ECI-B12Fx Network Bullet Camera Quick Start Guide Figure 2-3 3-Axis Adjustment 1). Loosen the No.3 screw to adjust the pan position [0° to 360°]. Tighten the screw after completing the adjustment. 2). Loosen the No.2 screw to adjust the tilt position [0° to 180°]. Tighten the screw after completing the adjustment. 3). Loosen the No.1 screw and rotate the camera [0° to 360°]. Tighten the screw after completing the adjustment.
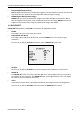
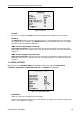
ECI-B12Fx Network Bullet Camera Quick Start Guide Figure 3-1 Main Menu Overview 5. Click the direction arrow to control the camera. 1). Click up/down direction button to select the item. 2). Click Iris + to confirm the selection. 3). Click left/right direction button to adjust the value of the selected item. 3.2 FORMAT Set the format as 2 MP @ 30 fps. 3.3 EXPOSURE Exposure describes the brightness-related parameters, which you can set the EXPOSURE MODE as GLOBAL, BLC, or DWDR.
ECI-B12Fx Network Bullet Camera Quick Start Guide • BLC (Backlight Compensation) BLC (Backlight Compensation) compensates light for the front object to make it clear, but this may cause the over-exposure of the background, where the light is strong. • DWDR (Digital Wide Dynamic Range) DWDR helps the camera provide clear images even under backlight circumstances.
ECI-B12Fx Network Bullet Camera Quick Start Guide Figure 3-3 AUTO • IR LIGHT You can turn on/off the IR LIGHT to meet the requirements of different circumstances. • SMART IR The SMART IR function is used to adjust the light to its most suitable intensity, and prevent the image from over exposure. The SMART IR value can be adjusted from 0 to 3. The higher the value is, the more obvious effects are.
ECI-B12Fx Network Bullet Camera Quick Start Guide • CONTRAST This feature enhances the difference in color and light between parts of an image. You can set the CONTRAST value from 1 to 9. • SHARPNESS Sharpness determines the amount of detail an imaging system can reproduce. You can set the SHARPNESS value from 1 to 9. • SATURATION Adjust this feature to change the saturation of the color. The value ranges from 1 to 9.