Network Bullet Camera ECI-B64Z2 Quick Start Guide
Manual Illustrations and Features Graphics (screen shots, product pictures, etc.) in this document are for illustrative purposes only. Your actual product may differ in appearance. Your product might not support all features discussed in this document. Hikvision USA Inc., 18639 Railroad St., City of Industry, CA 91748, USA • Hikvision Canada, 4848 rue Levy, Saint Laurent, Quebec, Canada, H4R 2P1 Telephone: +1-909-895-0400 • Toll Free in USA: +1-866-200-6690 • E-Mail: sales.usa@hikvision.com • www.hikvision.
CONFORMS THE APPLICABLE LAW. HIKVISION SHALL NOT BE LIABLE IN THE EVENT THAT THIS PRODUCT IS USED WITH ILLEGITIMATE PURPOSES. IN THE EVENT OF ANY CONFLICTS BETWEEN THIS MANUAL AND THE APPLICABLE LAW, THE LATER PREVAILS. Regulatory Information FCC Information Please take attention that changes or modification not expressly approved by the party responsible for compliance could void the user’s authority to operate the equipment.
Safety Instruction These instructions are intended to ensure that user can use the product correctly to avoid danger or property loss. The precaution measure is divided into “Warnings” and “Cautions” Warnings: Serious injury or death may occur if any of the warnings are neglected. Cautions: Injury or equipment damage may occur if any of the cautions are neglected. Warnings Follow these safeguards to prevent serious injury or death.
● ● ● ● ● ● ● Do not place the camera in extremely hot, cold (the operating temperature shall be -30° to +60° C, or -40° to 60° C if the camera model has an “H” in its suffix), dusty or damp locations, and do not expose it to high electromagnetic radiation. To avoid heat accumulation, good ventilation is required for operating environment. Keep the camera away from liquid while in use. While in delivery, the camera shall be packed in its original packing, or packing of the same texture.
Table of Contents 1 Appearance Description .................................................................................................... 0 1.1 Type I Camera ............................................................................................................ 0 2 Installation........................................................................................................................ 1 2.1 Memory Card Installation .......................................................................
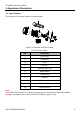
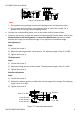
ECI-B64Z2 Quick Start Guide 1 Appearance Description 1.1 Type I Camera The overview of the type I camera is shown below. 2 1 3 7 8 9 10 4 D C12V I N 11 56 Figure 1-1 Overview of Type I Camera Table 1-1 Description No.
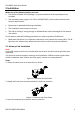
ECI-B64Z2 Quick Start Guide 2 Installation Make sure of the following before you start: ● The device included in the package is in good condition and all required parts are included. ● The standard power supply is 12 VDC or PoE (802.3af), and must be consistent with camera requirements. ● Equipment is powered-off during installation. ● The installation environment is correct. ● The wall or ceiling is strong enough to withstand four times the weight of the camera and mount.
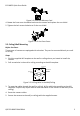
ECI-B64Z2 Quick Start Guide DC N I V 1 2 Figure 2-3 Insert the Memory Card 4. Rotate the front cover clockwise back onto the camera and replace the sun shield. 5. Tighten the lock screw clockwise to fix the sun shield. 2 V IN D1 C Figure 2-4 Fix the Front Cover 2.2 Ceiling/Wall Mounting Before You Start: These types of cameras are equipped with a bracket. They can be mounted directly to a wall or ceiling. Steps: 1.
ECI-B64Z2 Quick Start Guide Drill Template Drill Template Figure 2-6 Secure the Camera Note: ● The supplied screw package contains self-tapping screws and expansion bolts. ● For a cement wall (or ceiling), use expansion bolts to secure the camera. For a wooden wall (or ceiling), use self-tapping screws. 6. Connect the corresponding cables, such as the power cord or network cable. 7.
ECI-B64Z2 Quick Start Guide 8. Adjust zoom and focus (refer to 2.3 Zoom and Focus Adjustment). 9. (Optional) Install the water-resistant jacket for network interface. Refer to 2.4 Installation of Network Cable Water-Resistant Jacket (Optional) for detailed installation procedures. 2.3 Zoom and Focus Adjustment 2.3.1 Type I Purpose: Use the zoom lever and focus the lever to adjust zoom and focus levels. Follow the steps below to adjust focus and zoom. Steps: 1.
ECI-B64Z2 Quick Start Guide Figure 2-9 Zoom and Focus Adjustment via Web Browser 2.4 Installation of Network Cable Water-Resistant Jacket (Optional) Purpose: If the camera is installed outdoors, you can connect a water-resistant accessory to the network cable to protect it from water accumulation. ① ② ③ ④ ⑤ ⑥ ⑦ Figure 2-10 Waterproof Accessory Components No.
ECI-B64Z2 Quick Start Guide 6. Align the snap on the water-resistant endcap ④ with the notch on the camera’s network interface socket ①, and then secure the water-resistant endcap ④ to the camera’s network interface socket ① to finish installation. Align the snap and notch. i. Insert ⑤ into ④ . ii. Secure ⑥ with ④. Camera Switch/Router Figure 2-11 Water-Resistance Accessory Installation 3 Camera LAN Configuration Note: The use of products with Internet access carries inherent security risks.
ECI-B64Z2 Quick Start Guide 3.2 Activate the Camera Activate the camera by setting a strong password. Activation via web browser, activation via SADP, and activation via client software are supported. Activation via SADP software and web browser will be used as examples to introduce camera activation. Note: Refer to the Network Camera User Manual for activation via client software. 3.2.1 Activation via Web Browser Steps: 1. Power the camera on.
ECI-B64Z2 Quick Start Guide 3.2.2 Activation via SADP Software SADP software is used for detecting online devices, activating cameras, and resetting passwords. SADP can be obtained from the supplied disk or the official website, and installed by following the prompts. Follow the steps to activate the camera. Steps: 1. Run SADP to search for online devices. 2. Check the device status from the device list, and select the inactive device. Select inactive device. Input and confirm password.
ECI-B64Z2 Quick Start Guide Use the SADP software or client software to search and change the IP address of the device. IP Address modification via SADP software will be used as an example. In order to modify the IP address via client software, refer to the user manual of the client software. Steps: 1. Run SADP. 2. Select an active device. 3. Change the device IP address to the same subnet as your computer by either modifying the IP address manually, or by checking the Enable DHCP checkbox.
ECI-B64Z2 Quick Start Guide Web Browser: Internet Explorer 8.0 or higher, Apple Safari 5.0.2 or higher, Mozilla Firefox 5.0 or higher, or Google Chrome 18 or higher Steps: 1. Open the Web browser. 2. In the browser address bar, input the IP address of the network camera, and press the Enter key to enter the login interface. Note: The default IP address is 192.168.1.64. It is suggested that you change the IP address to the same subnet as your computer. 3. Input the user name and password.
ECI-B64Z2 Quick Start Guide 5 Hik-Connect Purpose: Hik-Connect is a mobile application to view live camera images, receive alarm notifications, etc. 5.1 Enable Hik-Connect for Use with Cameras Purpose: Enable Hik-Connect should on your camera before using the service. You can enable the service either via SADP software or a Web browser. 5.2 Enable Hik-Connect Service via SADP Software Steps: 1. Check the Enable Hik-Connect checkbox: 1).
ECI-B64Z2 Quick Start Guide 5.2.1 Enable Hik-Connect via a Web Browser Before You Start: Activate the camera before enabling the service. Refer to Chapter 3.2. for more information. Steps: 1. Access the camera via the Web browser. Refer to Chapter 4. 2. Enter the platform access configuration interface, as follows: Configuration > Network > Advanced Settings > Platform Access. Figure 5-2 Platform Access Configuration (Web) 3. Set the Platform Access Mode to Hik-Connect. 4. Check the Enable checkbox. 5.
ECI-B64Z2 Quick Start Guide Figure 5-3 Connect a Router Note: After the camera connects to the network, wait one minute before using the camera with Hik-Connect. 2. Add the camera to the Hik-Connect app: • If Accessing the Camera through an NVR: Tap “+” on the upper-right corner and scan the QR code that appears in the NVR interface. • If Accessing the Camera through a Web Browser: Tap the camera’s serial number. icon and type in the 3. Input your camera’s verification code.
ECI-B64Z2 Quick Start Guide QSG ECI-B64Z2 041018NA 14