
Quick Start Guide

D12Fx Network Dome Camera Quick Start Guide
QSG VE D12Fx 030218NA 7
●
The standard power supply is 12 VDC. Make sure your power supply matches that of
your camera.
●
Make sure that all of the related equipment is powered off during installation.
●
Check product specifications for the installation environment.
●
Make sure that the wall is strong enough to withstand four times the weight of the
camera and the bracket.
For cameras that support IR, you are required to take the following precautions in order to
prevent IR reflection:
●
Dust or grease on the dome cover will cause IR reflection. Do not remove the dome
cover film until installation is finished. If there is dust or grease on the dome cover,
clean it with a soft cloth and isopropyl alcohol.
●
Make sure that there is no reflective surface too close to the camera lens. The IR light
from the camera may reflect back into the lens to cause reflection.
●
The foam ring around the lens must be seated flush against the inner surface of the
bubble so as to isolate the lens from the IR LEDS. Fasten the dome cover to the camera
body so that the foam ring and dome cover attach seamlessly.
Steps:
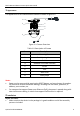
1. Attach the drill template to the ceiling.
2. Drill the screw holes and cable hole (optional) into the ceiling according to the drill
template.
Note:
A cable hole is required when you use a ceiling outlet to route the cables.
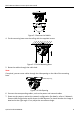
Drill Template
Hole A: for cables routed th ro ug h the ceiling
screw hole 1: for Mounting Base
1
1
A
3 Φ 4.5 mm (0.2'')
Φ 100.4 mm (4'')
Φ 111 mm (4.4'')
Drill Template
Figure 2-1
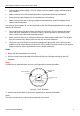
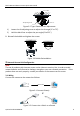
3. Loosen the screws with a hex wrench (supplied) to remove the bubble.
Note:
The three screws do not need to be completely unscrewed.