
User Manual
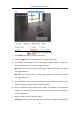

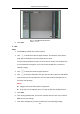
Table Of Contents
- Chapter 1 System Requirement
- Chapter 2 Network Connection
- Chapter 3 Access to the Network Camera
- Chapter 4 Wi-Fi Settings
- Chapter 5 Live View
- Chapter 6 Network Camera Configuration
- Chapter 7 Network Settings
- 7.1 Configuring Basic Settings
- 7.2 Configure Advanced Settings
- 7.2.1 Configuring SNMP Settings
- 7.2.2 Configuring FTP Settings
- 7.2.3 Configuring Email Settings
- 7.2.4 Platform Access
- 7.2.5 Wireless Dial
- 7.2.6 HTTPS Settings
- 7.2.7 Configuring QoS Settings
- 7.2.8 Configuring 802.1X Settings
- 7.2.9 Integration Protocol
- 7.2.10 Bandwidth Adaptation
- 7.2.11 Network Service
- 7.2.12 Smooth Streaming
- 7.2.13 HTTP Listening
- Chapter 8 Video/Audio Settings
- Chapter 9 Image Settings
- Chapter 10 Event Settings
- 10.1 Basic Events
- 10.2 Smart Events
- 10.2.1 Configuring Audio Exception Detection
- 10.2.2 Configuring Defocus Detection
- 10.2.3 Configuring Scene Change Detection
- 10.2.4 Configuring Face Detection
- 10.2.5 Configuring Intrusion Detection
- 10.2.6 Configuring Line Crossing Detection
- 10.2.7 Configuring Region Entrance Detection
- 10.2.8 Configuring Region Exiting Detection
- 10.2.9 Configuring Unattended Baggage Detection
- 10.2.10 Configuring Object Removal Detection
- 10.3 VCA Configuration
- Chapter 11 Storage Settings
- Chapter 12 Playback
- Chapter 13 Picture
- Chapter 14 Application
- Chapter 15 Open Platform
- Chapter 16 Smart Display
- Appendix

Network Camera User Manual
147
a. Select the target picture size. Four types are available: Custom, Head
Shot, Half-Body Shot and Full-Body Shot. If you select the Custom, you
can customized the width, head height and body height as required.
b. Check the Fixed Value to set the picture height.
Background Picture Settings
a. Select the Picture Quality and Resolution from the drop-down list.
b. Check Background Upload to upload the background image.
Note: Background upload is only available for face capture camera.
Camera Information:
You can set the Device No. and Camera Info. for the camera, which can be
overlaid on captured picture.
Text Overlay Information:
You can check desired items and adjust their order to display on captured
pictures.
Shield Region
The shield region allows you to set the specific region in which the face capture does
not work. Up to 4 shield regions are supported.
Steps:
1. Click to draw shield area by left click end-points in the live view window,
and right click to finish the area drawing.
Notes:
● Polygon area (4 to 10 sides) sides is supported.
● Click to delete the drawn areas.
● If the live view is stopped, there is no way to draw the shield regions.